SPATIAL AUDIO for 360 VIDEO with REAPER and the FB360 SPATIAL WORKSTATION
A great example of a 360 video with spatial audio on YouTube (try it with headphones)
Steps
- Recording
- Audio Post Production
- Exporting, Encoding, Publishing
Sounds
- Sounds recorded on set: the human voice, atmospherical sounds, musical instruments, machines, …
- A separately recorded narrator (voice over)
- Music
- SFX / Sound Design
1) RECORDING ON SET
ZOOM H2N
- This is a microphone that you would typically put in the same place as the camera
- Make sure it has firmware version 2 installed
- See the manual from firmware v2 for information about the Spatial Audio mode for recording
- The display side is the front of the microphone
- Go to “MENU / REC / REC FORMAT” and select “WAV48kHz/24bit”
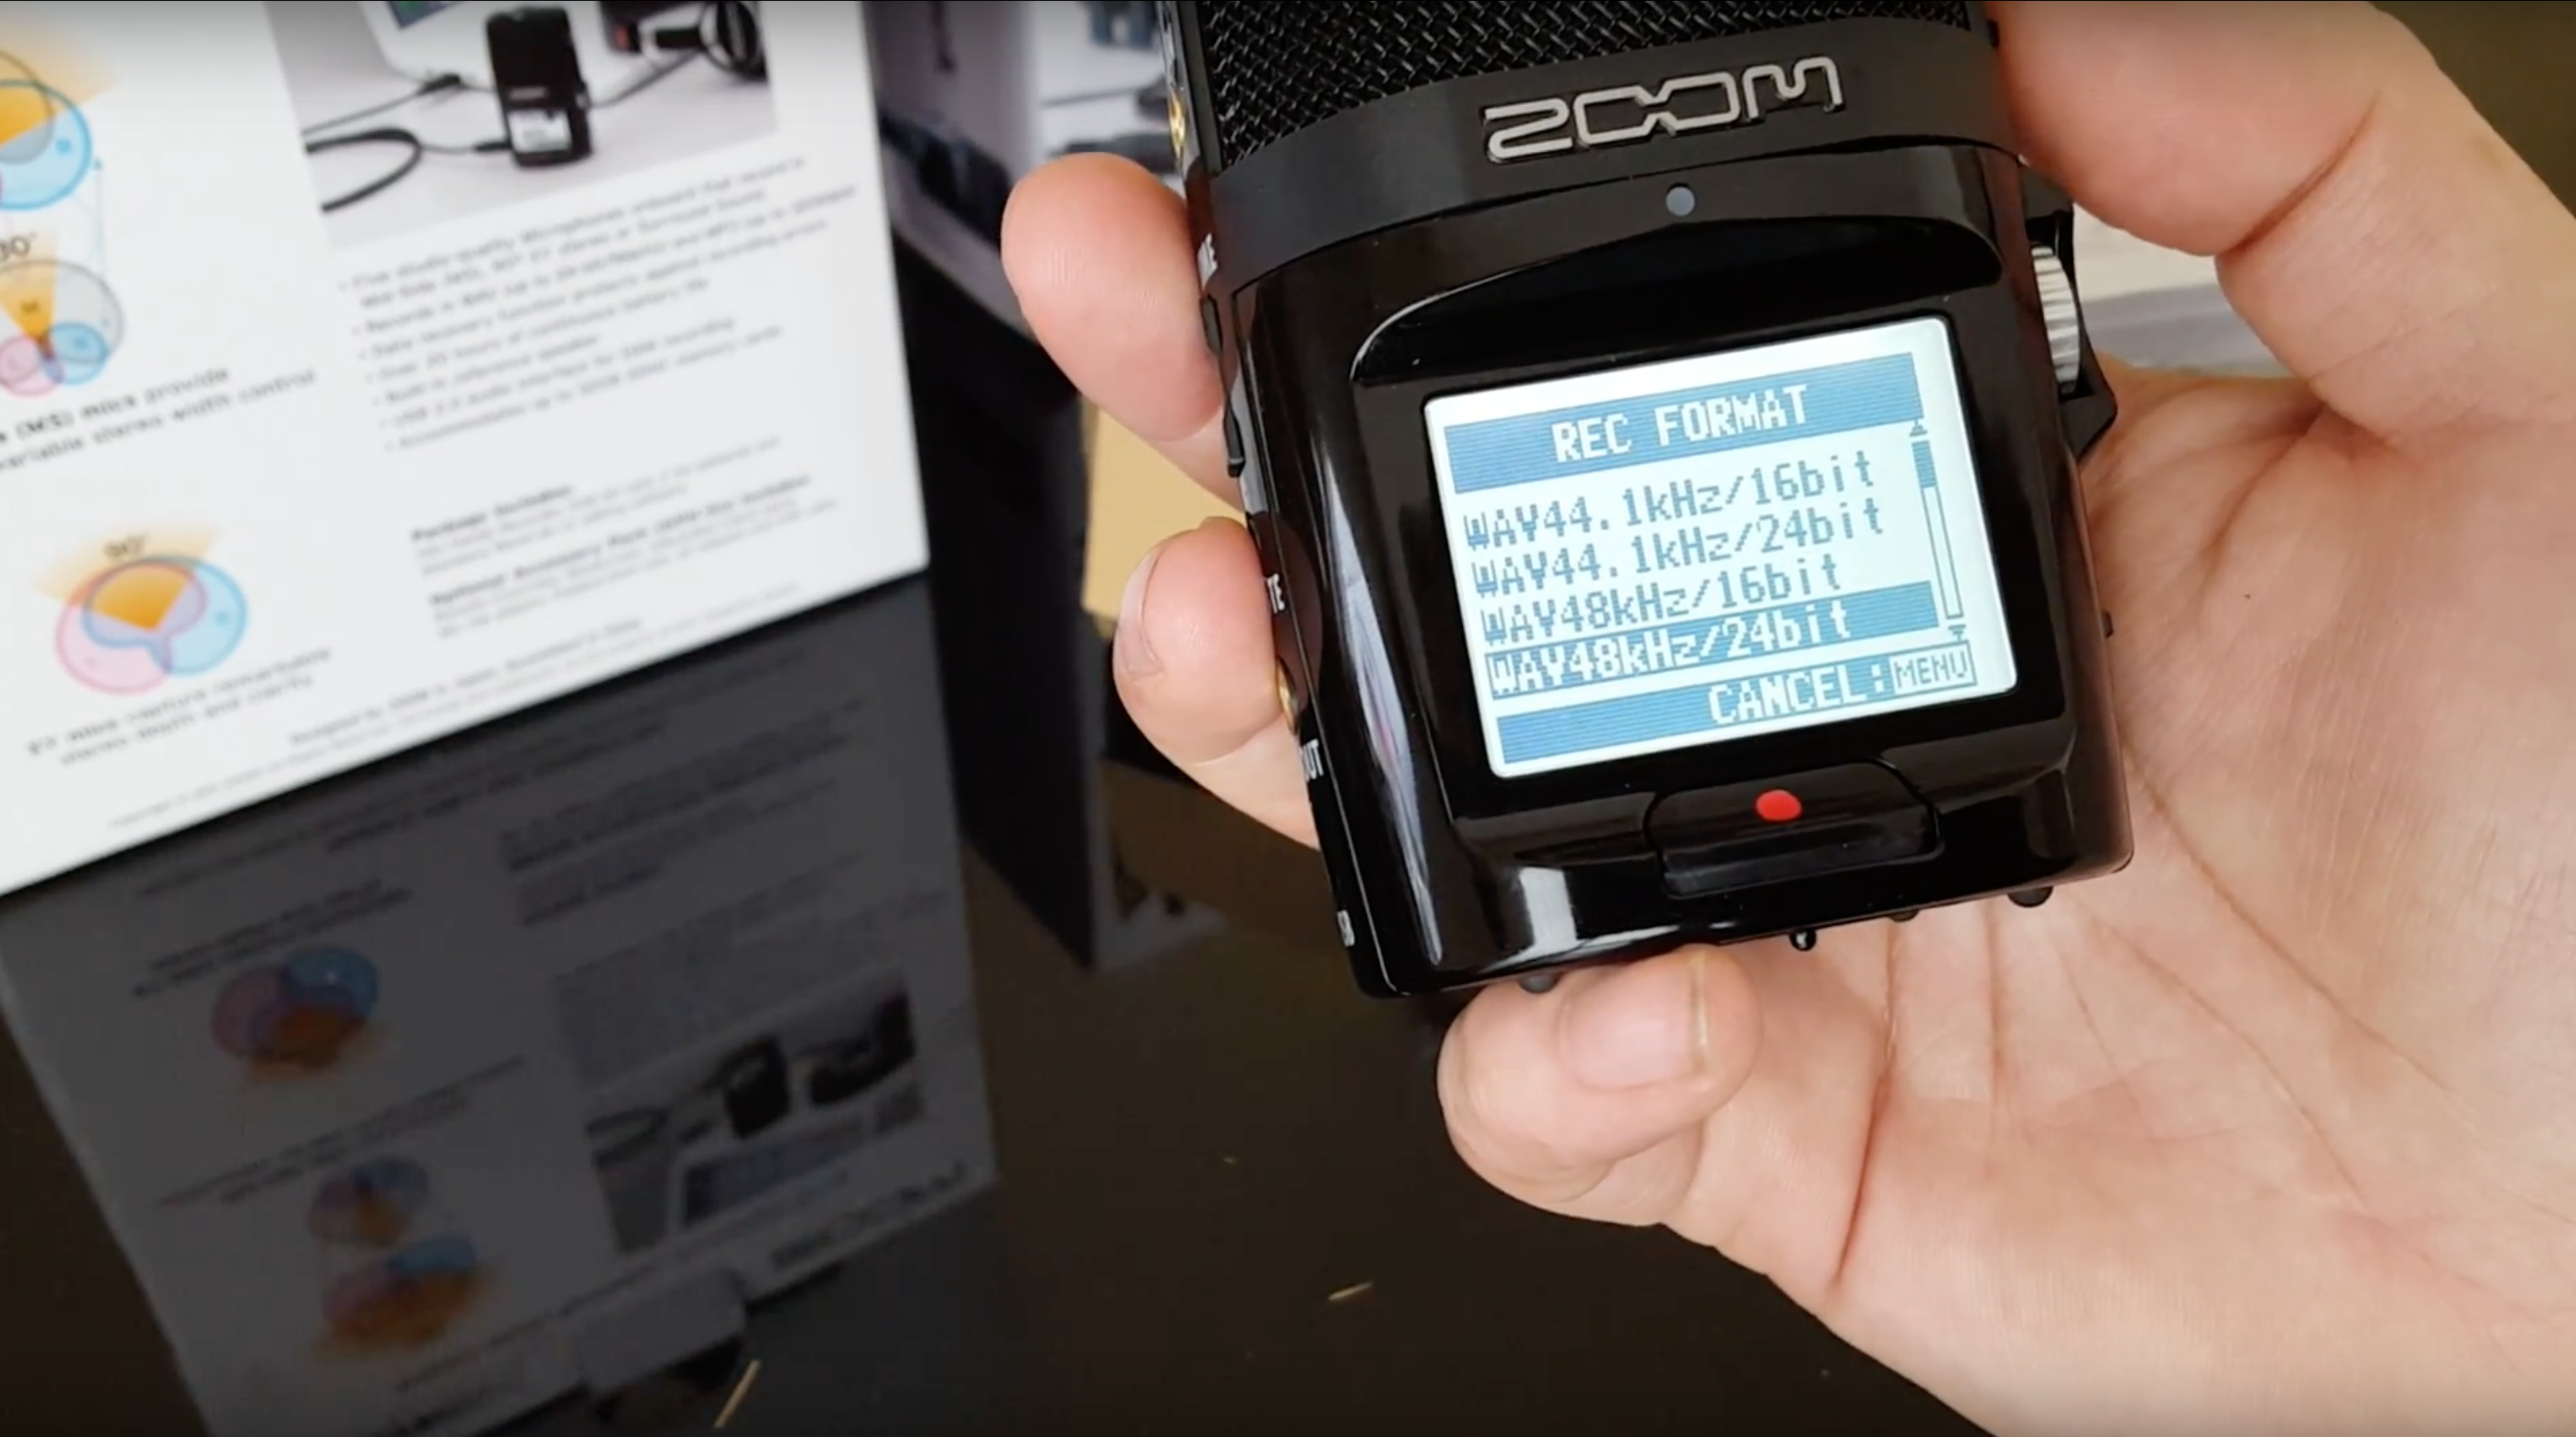
Record format: Wav audio with a sample rate of 48kHz and a bit depth of 24
- Go to “MENU / REC / SPATIAL AUDIO” and select “ON”
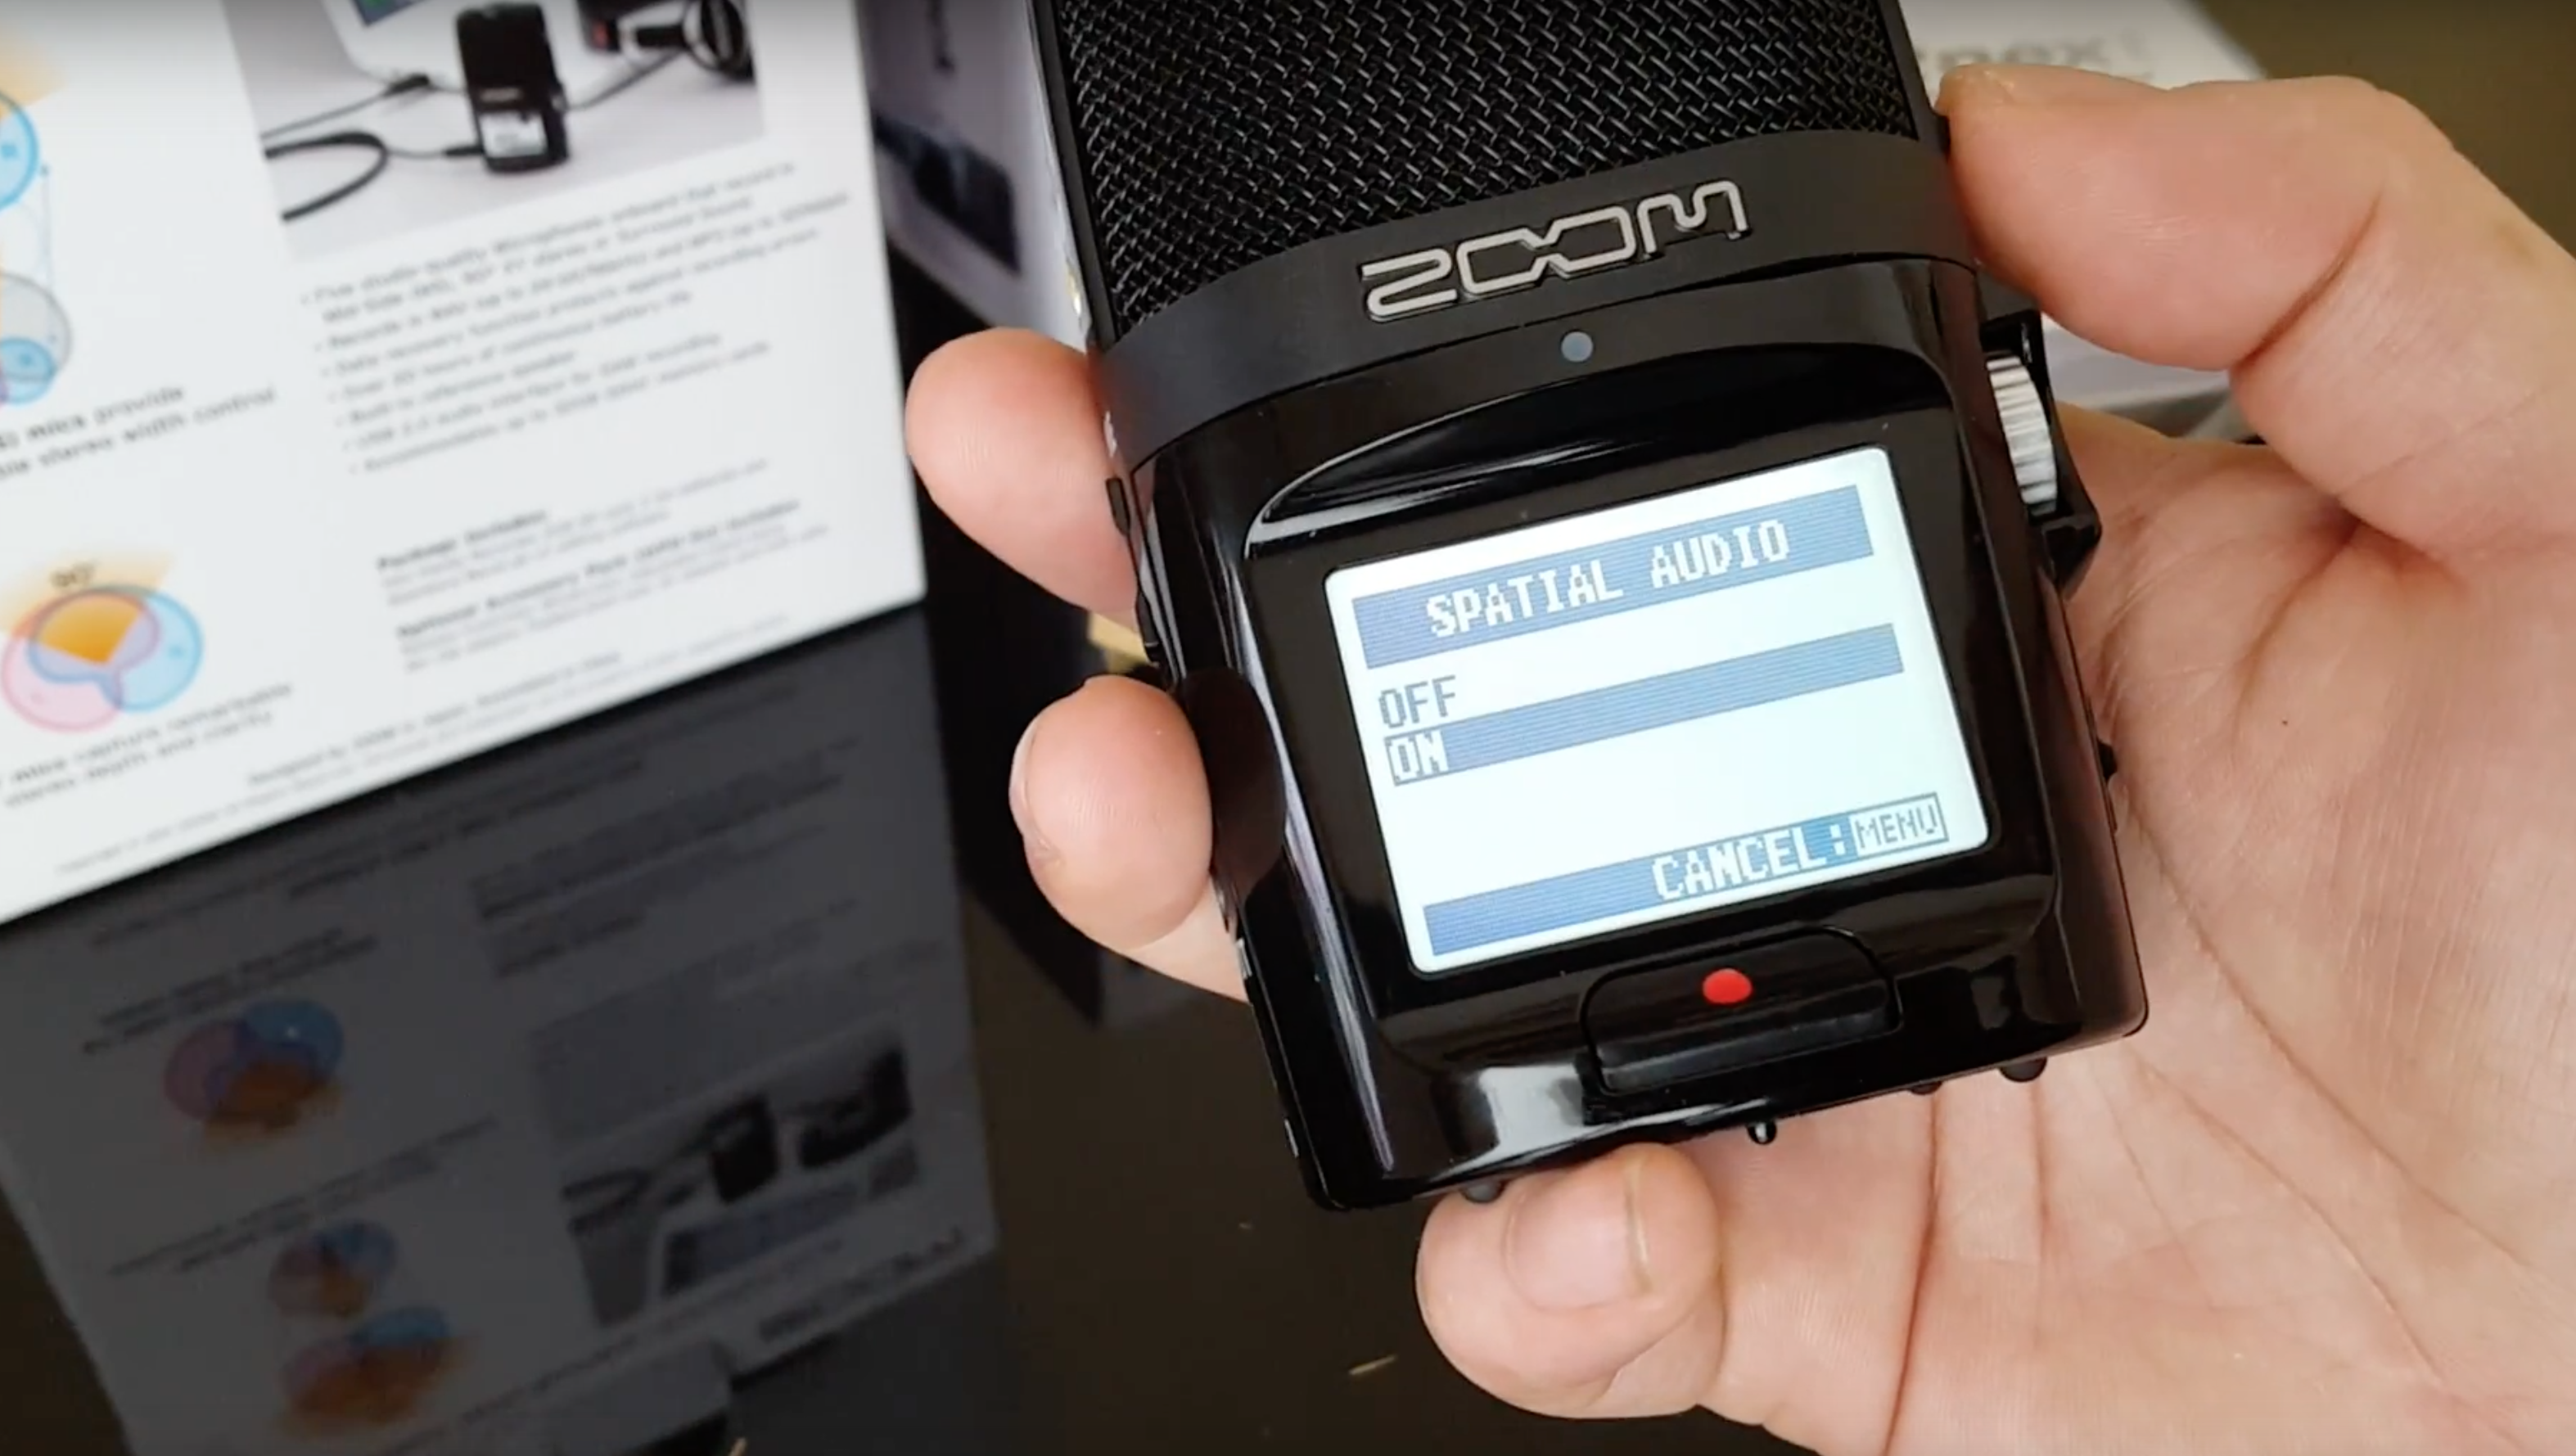
Spatial audio mode ‘on’
- Set the mic gain so that it records loud enough without clipping
- This setup of the H2N will record a 4 channel (surround) WAV audio file in AmbiX format
- The 3rd channel of an H2N recording (up/down information) will always be empty: the H2N only records in the horizontal plane
SENNHEISER AMBEO microphone & ZOOM F8 or F4 recorder

The Sennheiser AMBRO VR microphone and ZOOM F8 recorder
- The Sennheiser AMBEO is a microphone that you would typically put in the same place as the camera
- The microphone has 4 capsules that are very precisely tuned. It is important to give each capsule an exactly equal amount of gain at the input stage of the recorder. In order to achieve this, the 4 recording channels that are used for the AMBEO microphone need to be linked.
- Make sure that the 4 XLR connectors of the AMBEO microphone are correctly attached to the unit (1,2,3,4 in input 1,2,3,4 respectively).
- The Sennheiser AMBEO microphone outputs in A-format and this signal needs to be converted to B-format in the ZOOM F8 or F4 recorder (firmware 4.0 and up) or later in post production with the Sennheiser A-B format converter.
LAVALIER Microphones (aka lapel mics, or clip-on) or other (spot) Microphones
- Hide the microphone and transmitter under the clothes of the actor. This is an art in itself: how to get a good signal without the microphone being in view. You do not want to get noise from clothing or movement in your recording. You can minimise the sound of clothing by sticking a piece of cloth, felt or moleskin over the microphone.
- Sounds recorded with Lavalier or other spot mics later need to be spatialised in Post Production with the FB360 Spatialiser Plugin.
General Recording Tips
- Always record in 24 bits (not 16!). When working with film (also 360 film) you set the sample rate to 48kHz
- Take a picture from the setup so that you can later check how things were setup / connected
- Audio and video are recorded on different devices. This means that later in post production you will need to be able to select the correct takes in the audio and video, and you need to be able to synchronise sound and picture manually. In order to do this make sure to call scene and take numbers while shooting, and use a clapperboard (or digital slate) for a reference in both video and audio.
- Make sure to eliminate any set noise that you do not want to record. Listen carefully for noise of airco or other machines. These sounds are often overlooked (heard) on set but are very present when listening to the recordings in another setting.
2) AUDIO POST PRODUCTION
AUDIO POST PRODUCTION PREPARATION
- Download Reaper: http://www.reaper.fm/
- Download the Reaper Template and some files for practise here (From the project EYE- MovieZone VR)
- Download FB360 Spatial Workstation: https://facebook360.fb.com/spatial-workstation/
- If using the AMBEO microphone, download the Sennheiser A-B Format Converter here
- Install the Software
- On some Windows machines the FFmpeg library is not automatically installed. You will notice this when importing or playing back video in the FB360SWS fails. See this link for help
MATERIAL FOR PRACTISE
- The video SC3_4-T002_TB_2K is a low resolution mp4 file in STEREOSCOPIC Top/Bottom layout (recorded with the Nokia OZO). Videos recorded by Samsung Gear 360 camera are MONOSCOPIC. notice the difference.
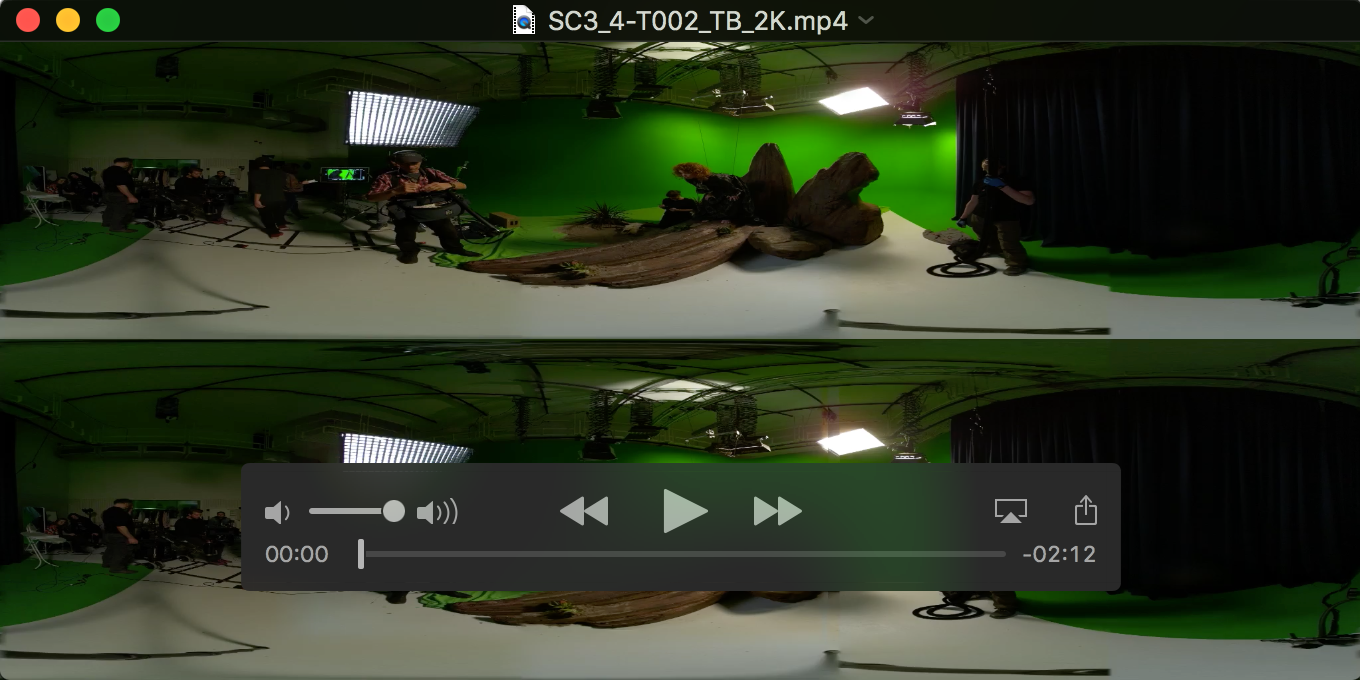
A stereoscopic Top-Bottom Video (Still from EYE – MovieZone VR)
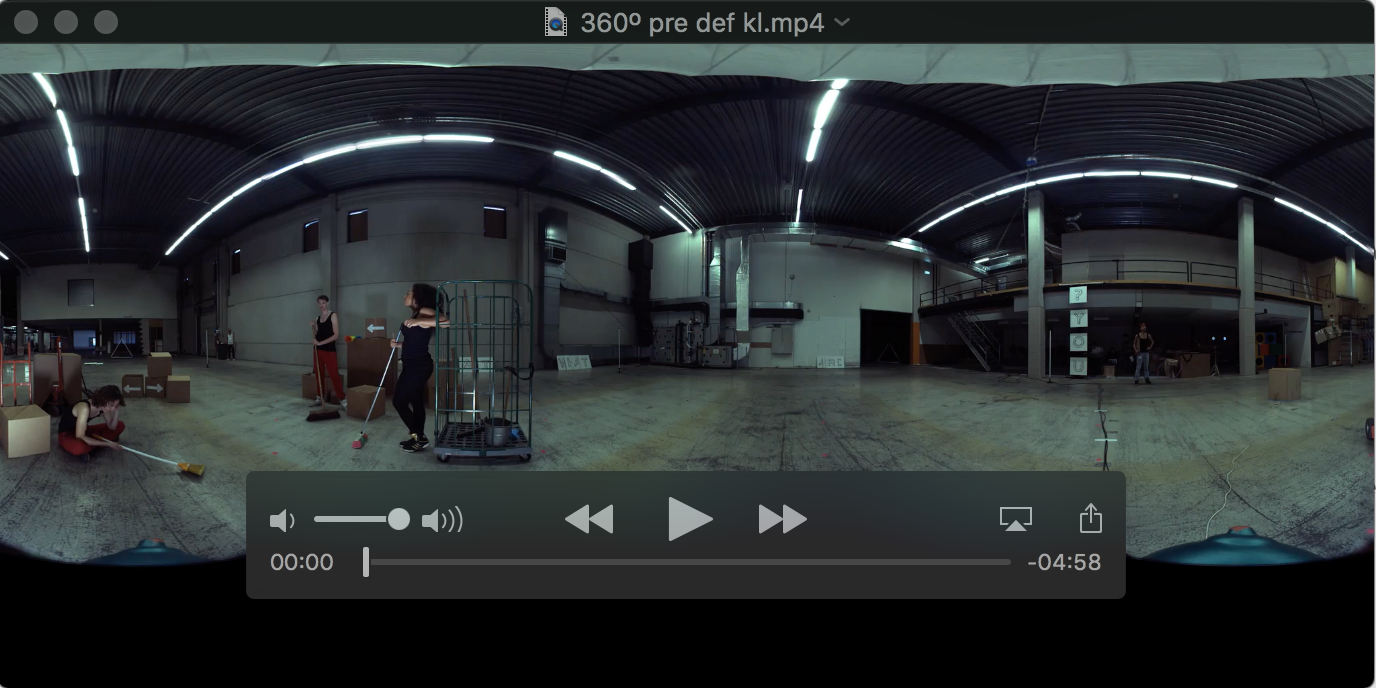
A monoscopic video (Still from “What Do We Care 4” – Steye & the Bizonkid)
- Audio file SC3_4-T002_AmbiX is a 4 channel ambisonics audio file in AmbiX format. This is the same format as the H2N records, except that in this file there is also audio in the 3rd channel (it was recorded with the Sennheiser Ambeo mic + Zoom F8 recorder and converted to ambiX format with the Sennheiser A-B format converter).
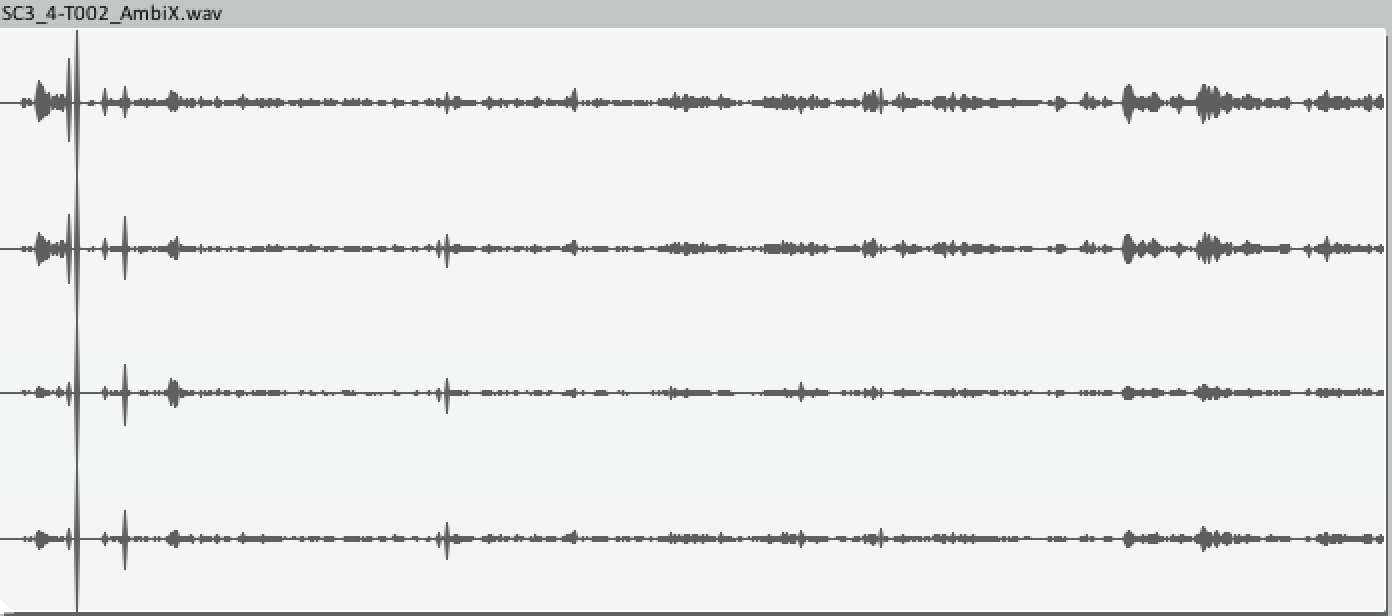
SC3_4-T002_AmbiX
- Audio file SC3_4-T002_Tr4_Geluidsman is the lavalier recording of the sound recordist in the front who is explaining about his setup.
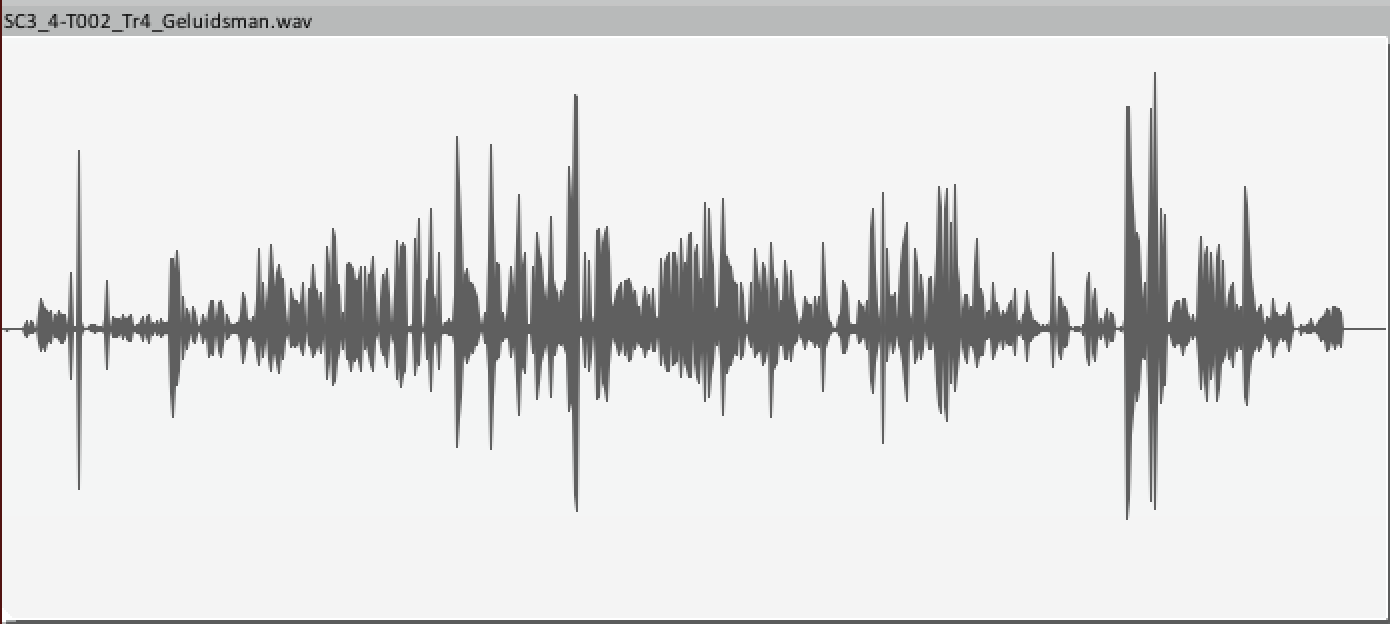
SC3_4-T002_Tr4_Geluidsman
REAPER
- Start Reaper
- Open the Template project
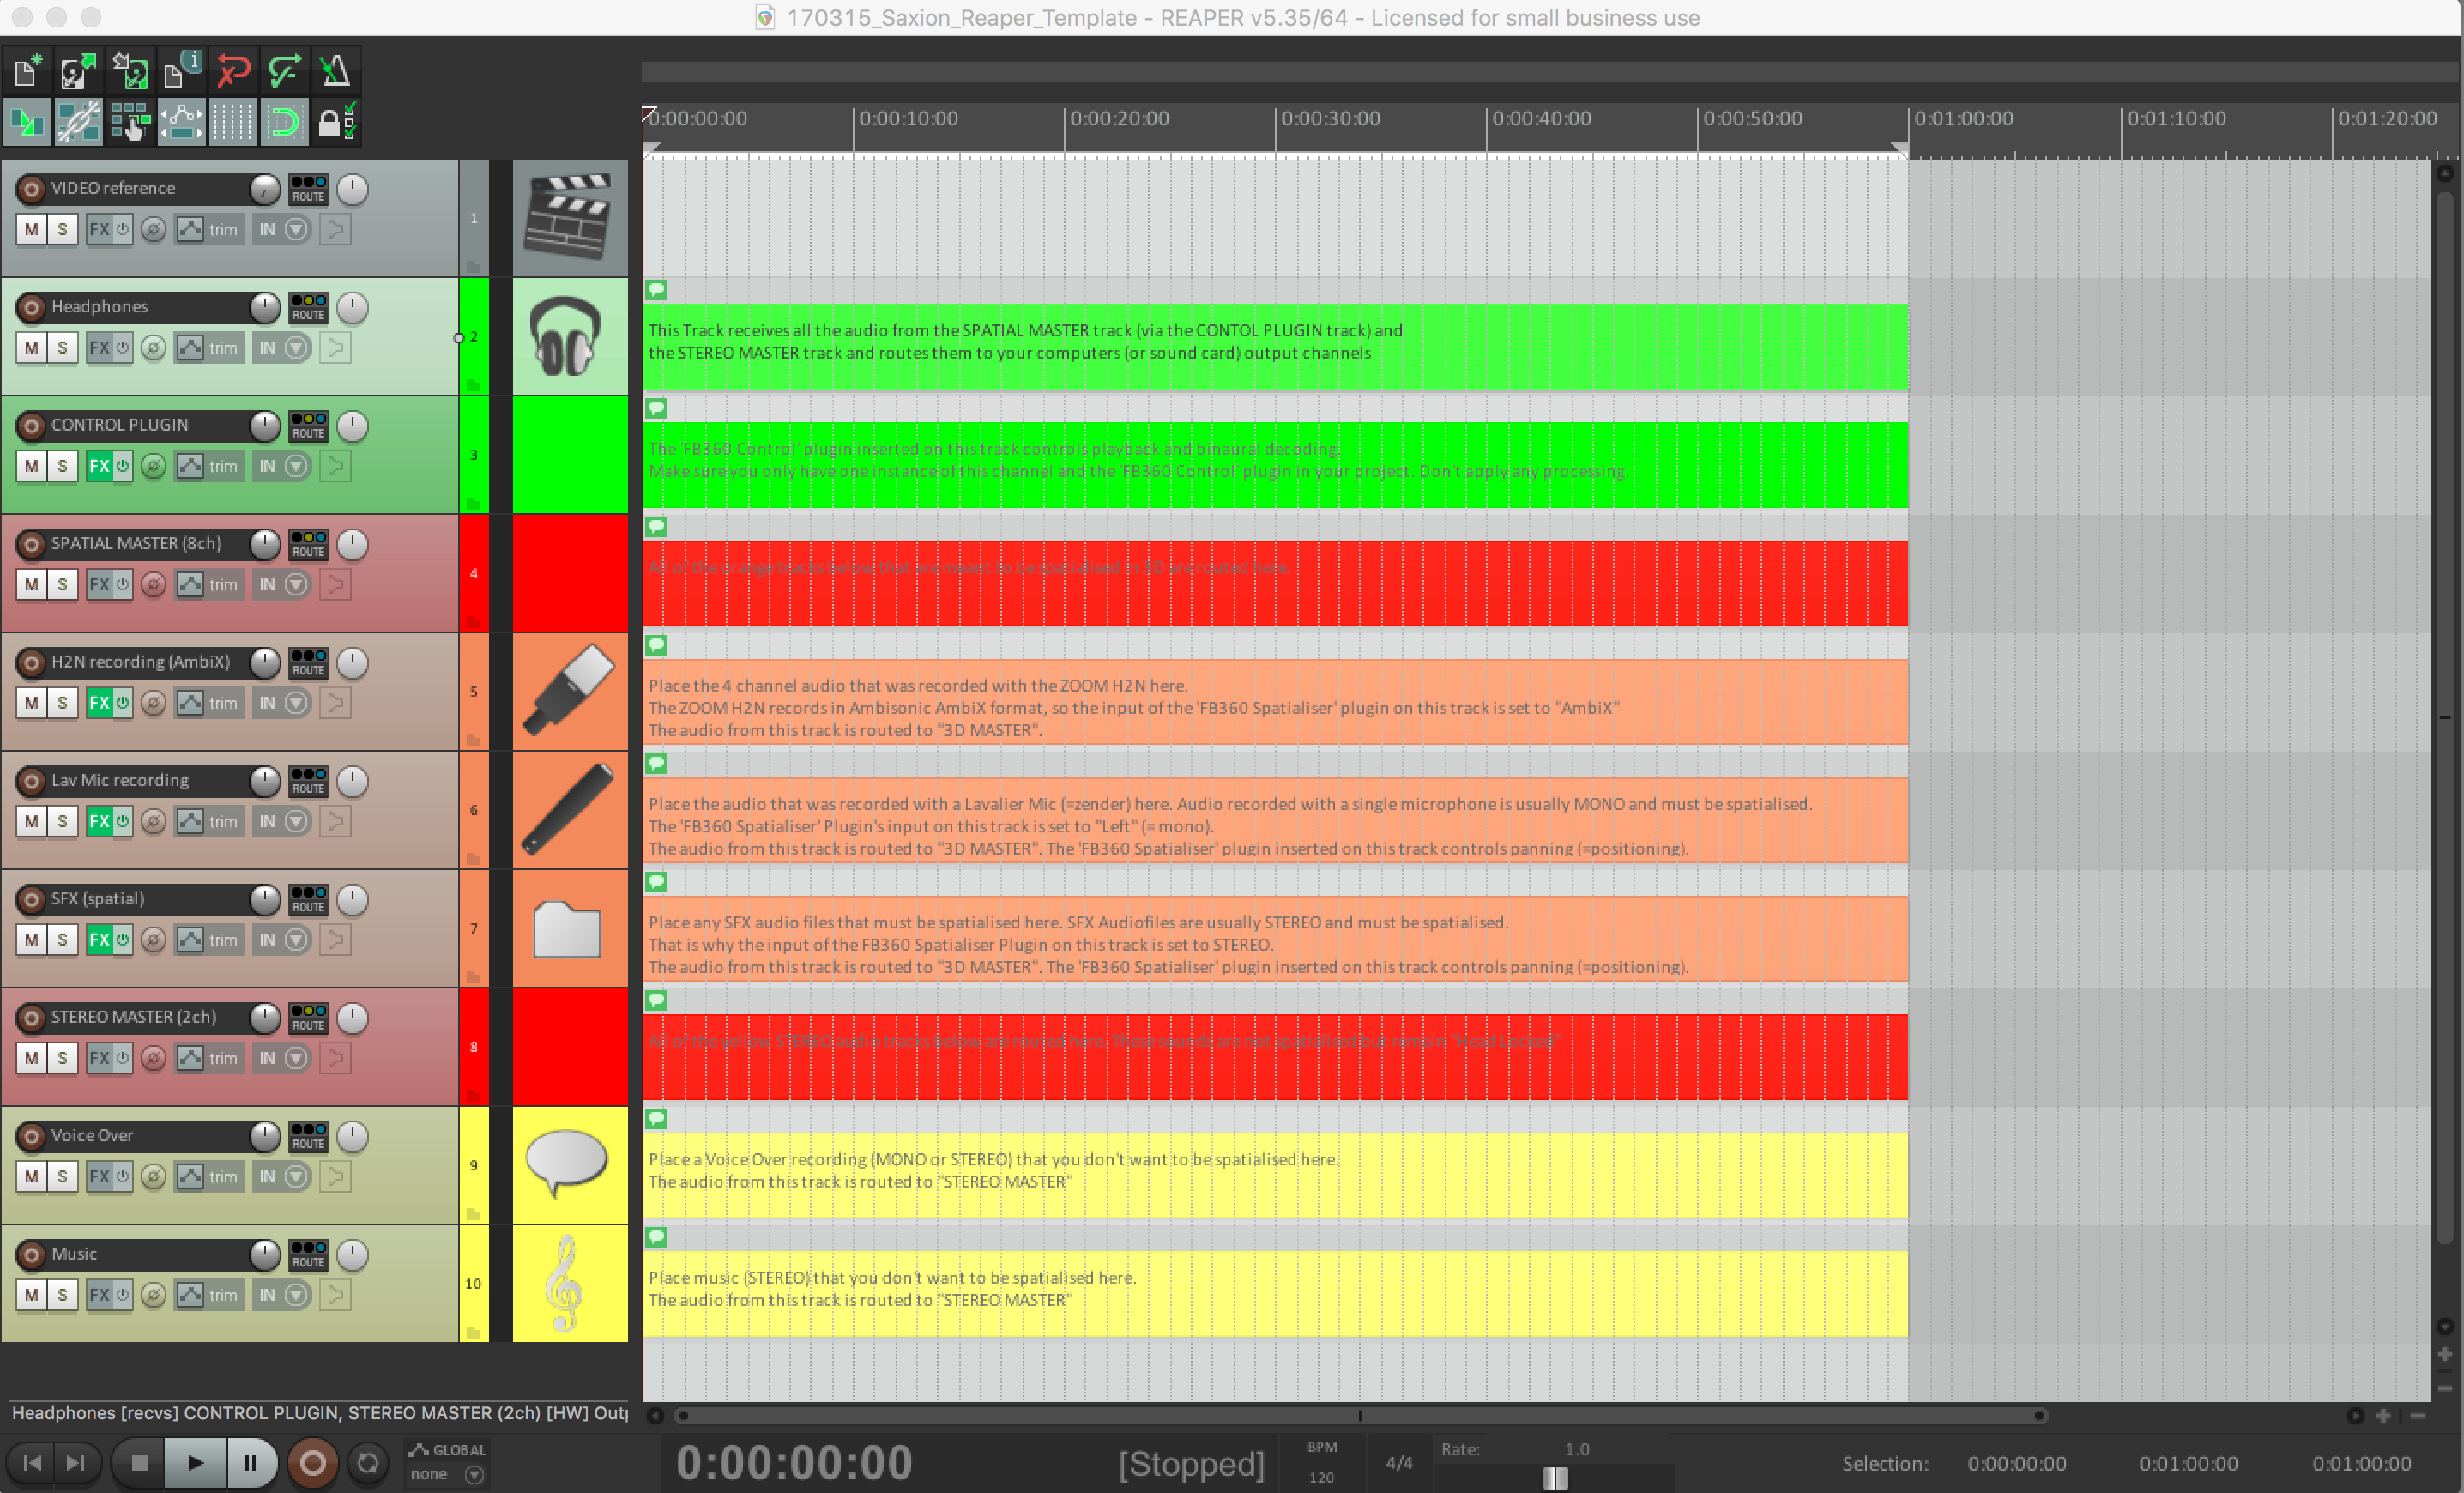
Reaper template project
- Go to [File / Save project as…], Select “create subdirectory for project” and “copy all media into project directory” and save the project under a different name. Creating a subdirectory for your project and copying all audio files there makes sure that you will have all of the data in your project in one folder. This makes it easy to store and access the project later or move it to another computer.
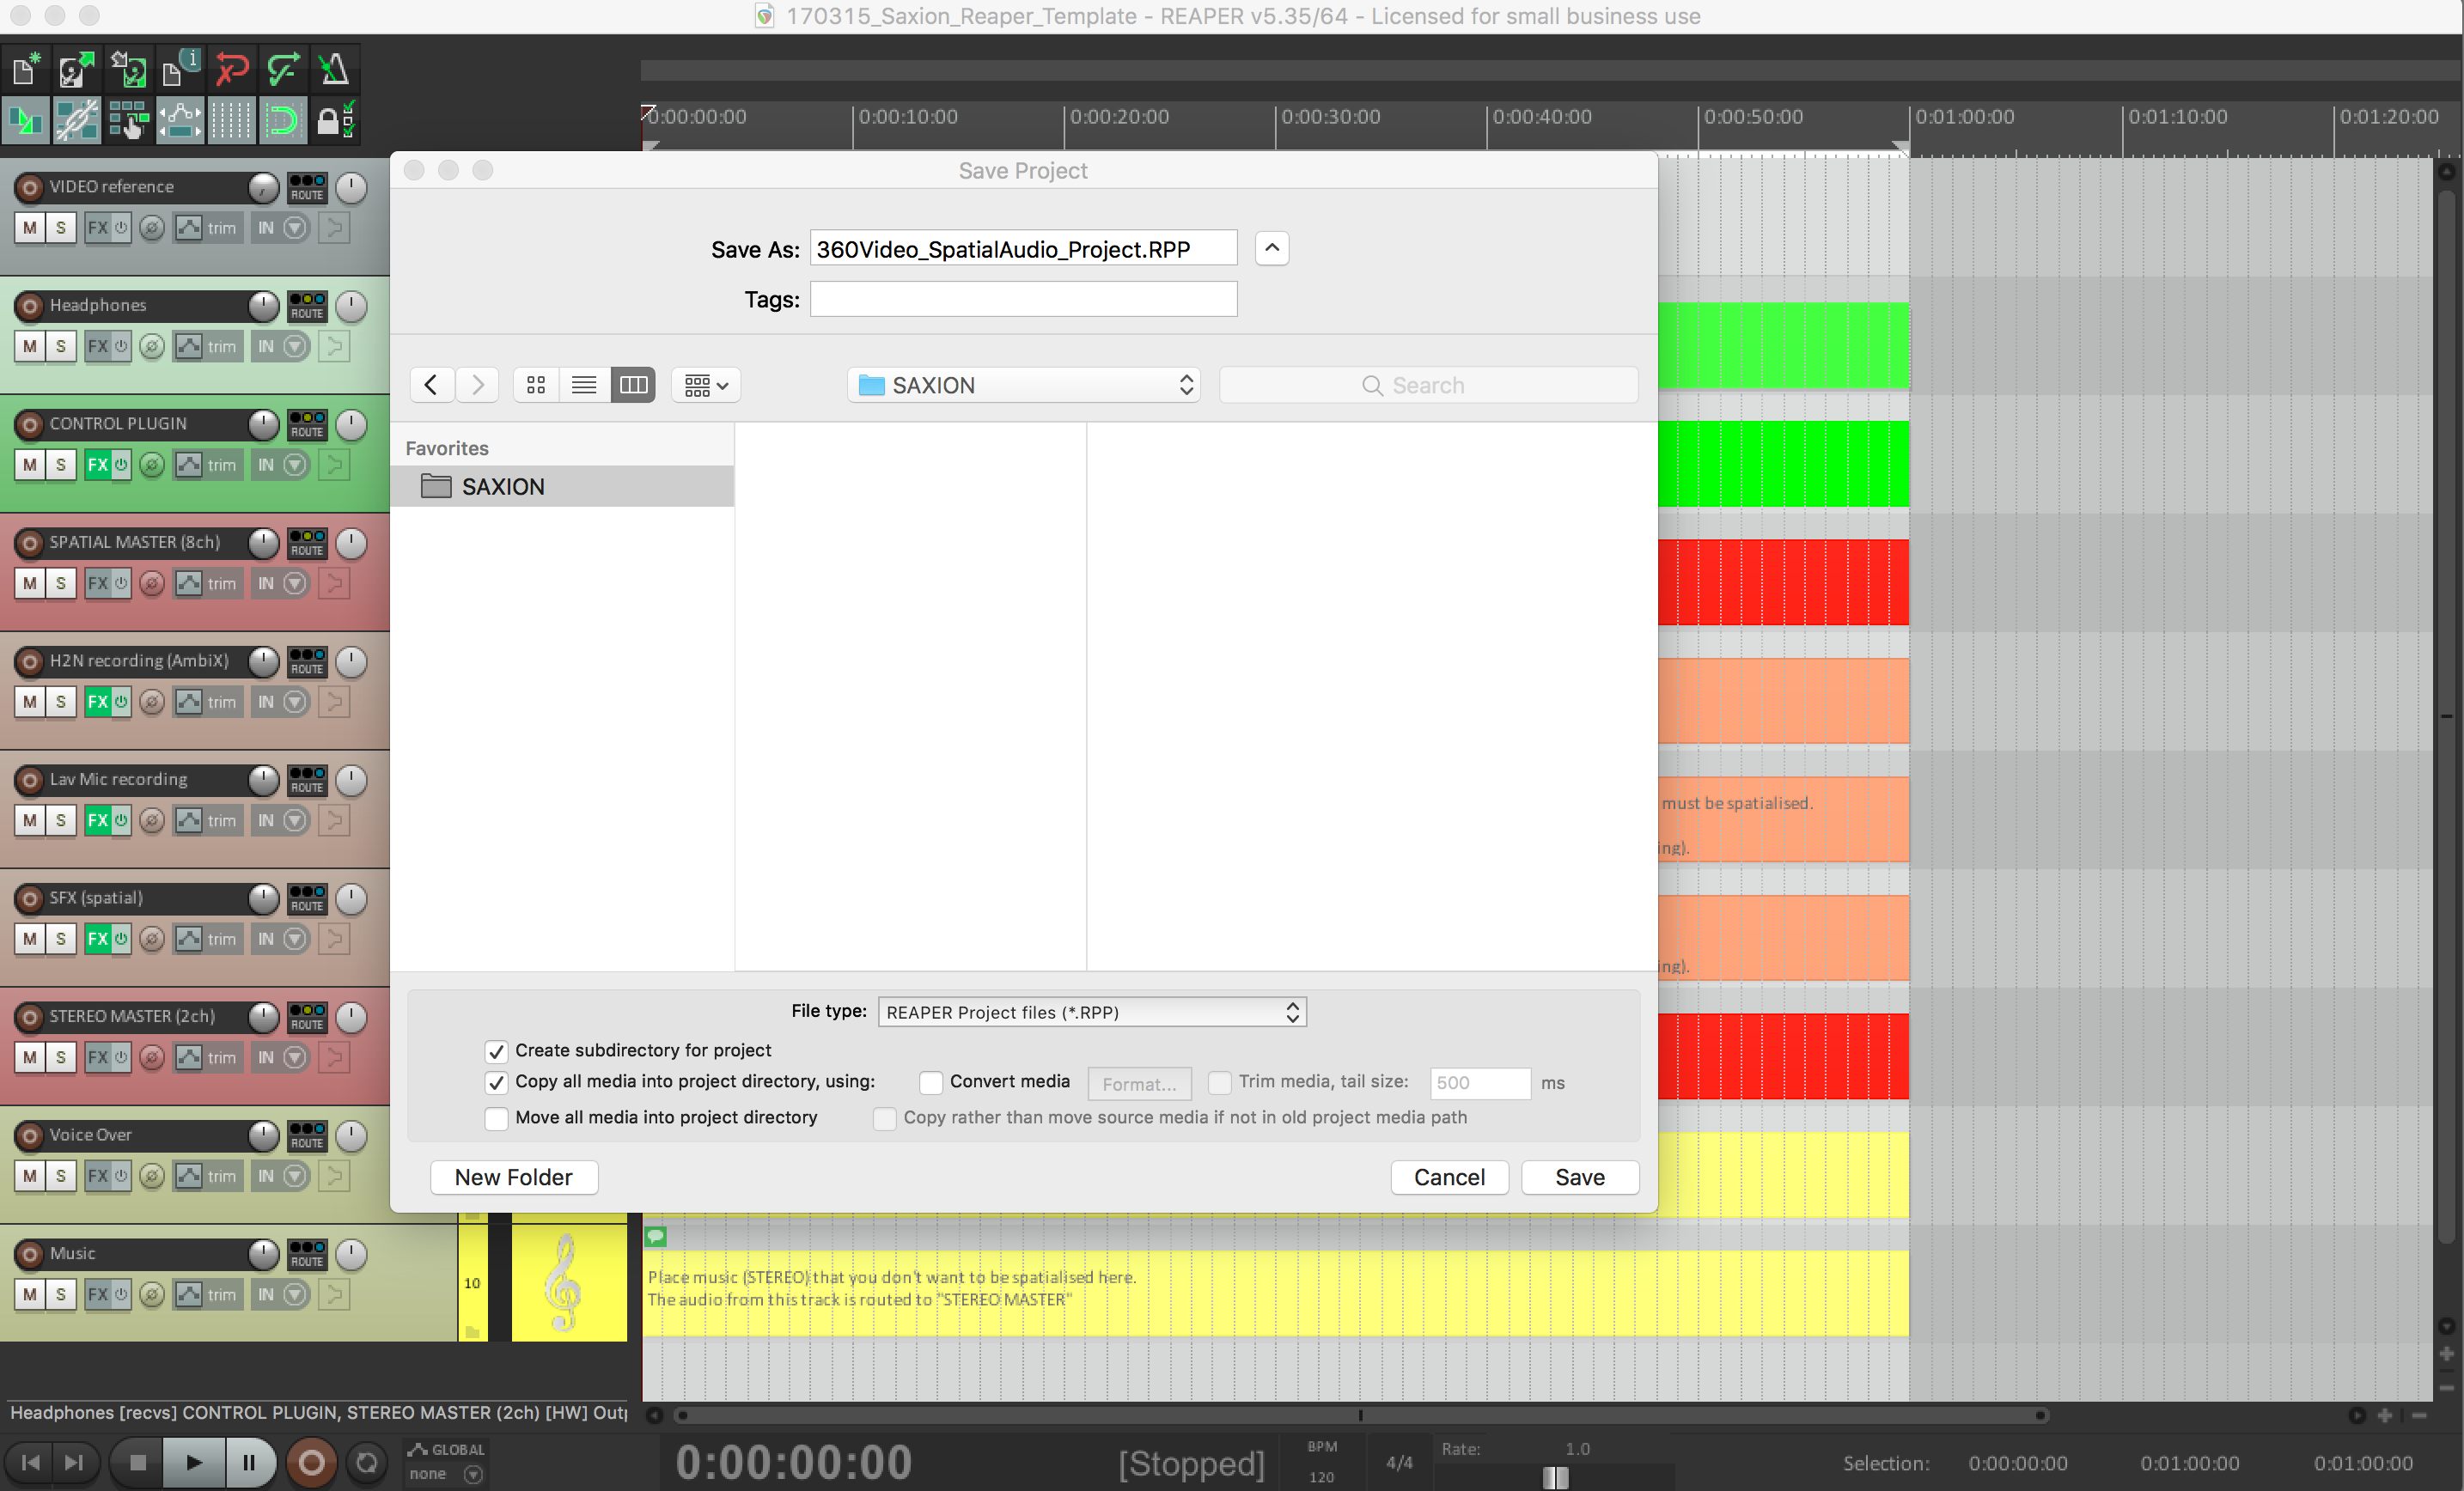
Save project as
- Now we need to set up the audio device. In order for Reaper to send audio to the hardware audio output of your computer we need to select it in Reaper’s preferences. Go to: [Options / Preferences] and the Reaper Preferences window will appear. Under ‘Audio’ go to ‘Device’ and select your audio hardware.
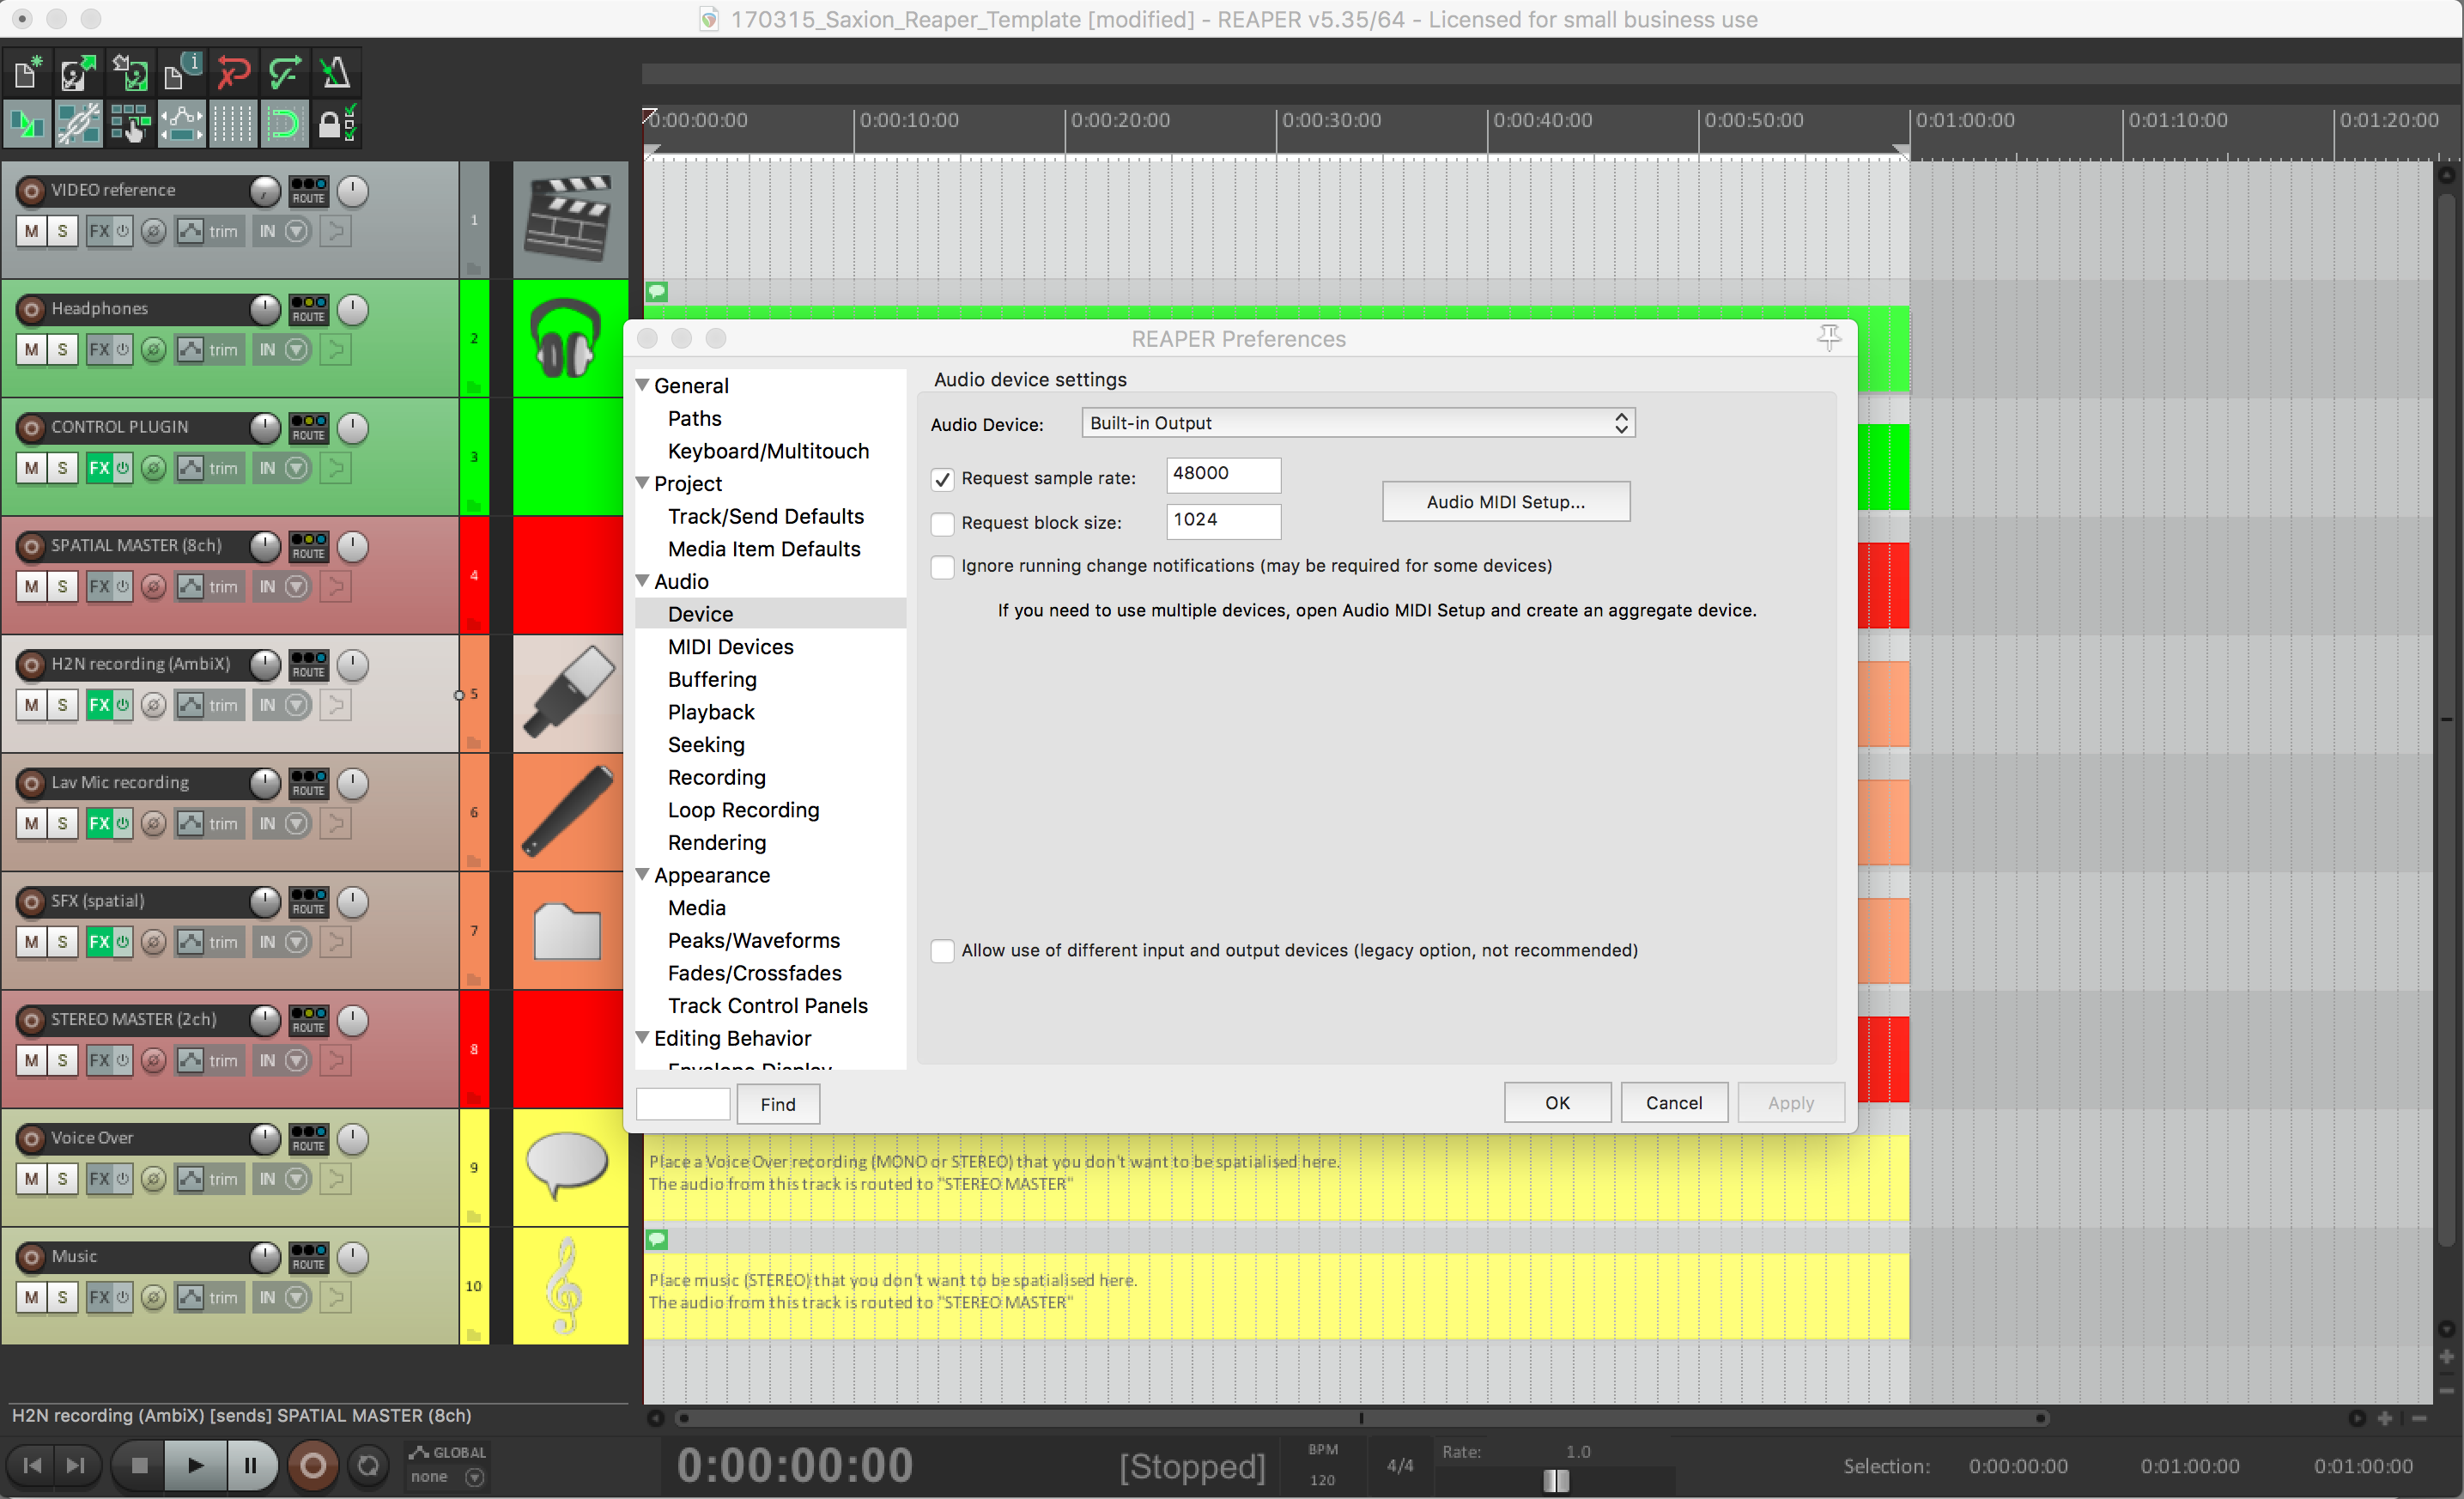
Select your audio device in Reaper’s Preferences
- Have a closer look at the template project. The two yellow tracks on the bottom are ‘normal’ stereo tracks that feed the STEREO MASTER (2ch) track and the three orange tracks above are ‘spatial’ audio tracks for different input sources. These (orange) spatial audio tracks feed the SPATIAL MASTER (8ch) track. These two MASTER tracks are the tracks you will eventually export from our project to add to your 360 video.
- The two green tracks are for monitoring (Headphones) and room/video control (CONTROL PLUGIN). The Headphones track will receive all audio from your project and is meant to be routed to the hardware audio output of your computer. Click on the “route” button of the Headphones track to verify or change the routing. Under “Audio Hardware Outputs” you can delete, change or add outputs. Select the stereo output of your system here.
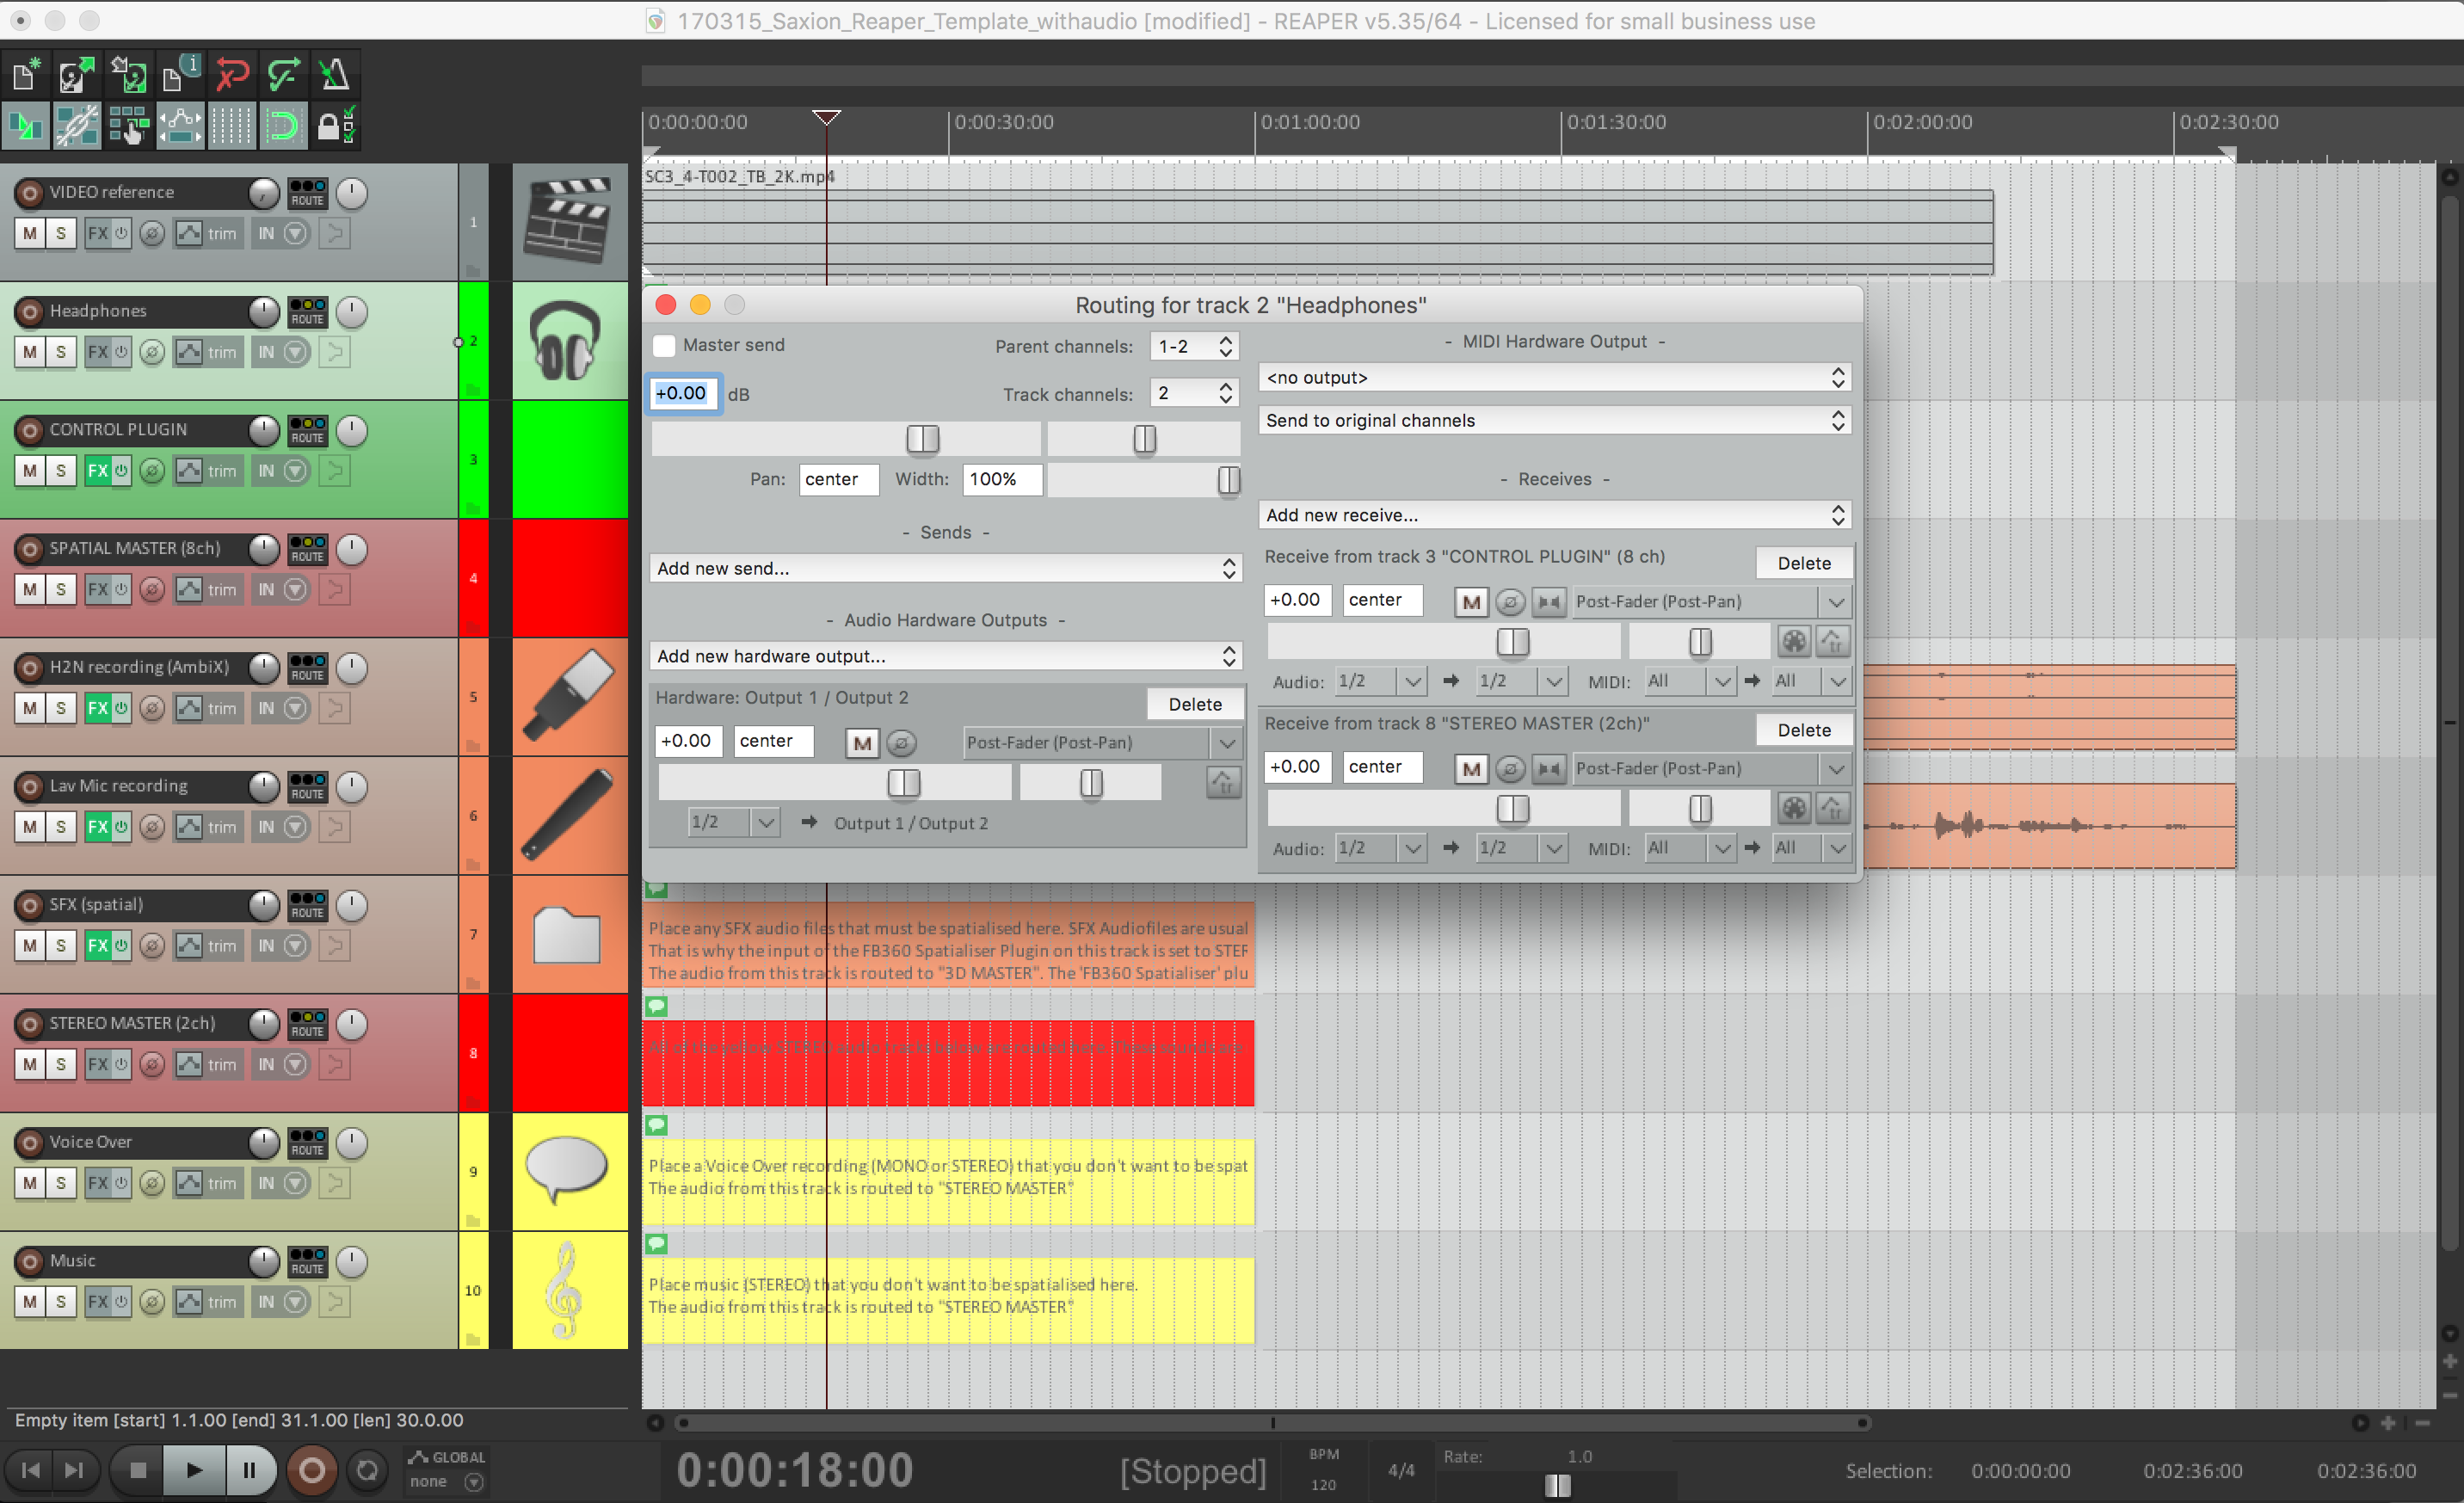
Here you can route the output of the Headphones track to your system output
- Drag your video into the “Video Reference” track, lower the volume on this channel by moving the fader all the way down (we don’t need to hear the audio of the video)
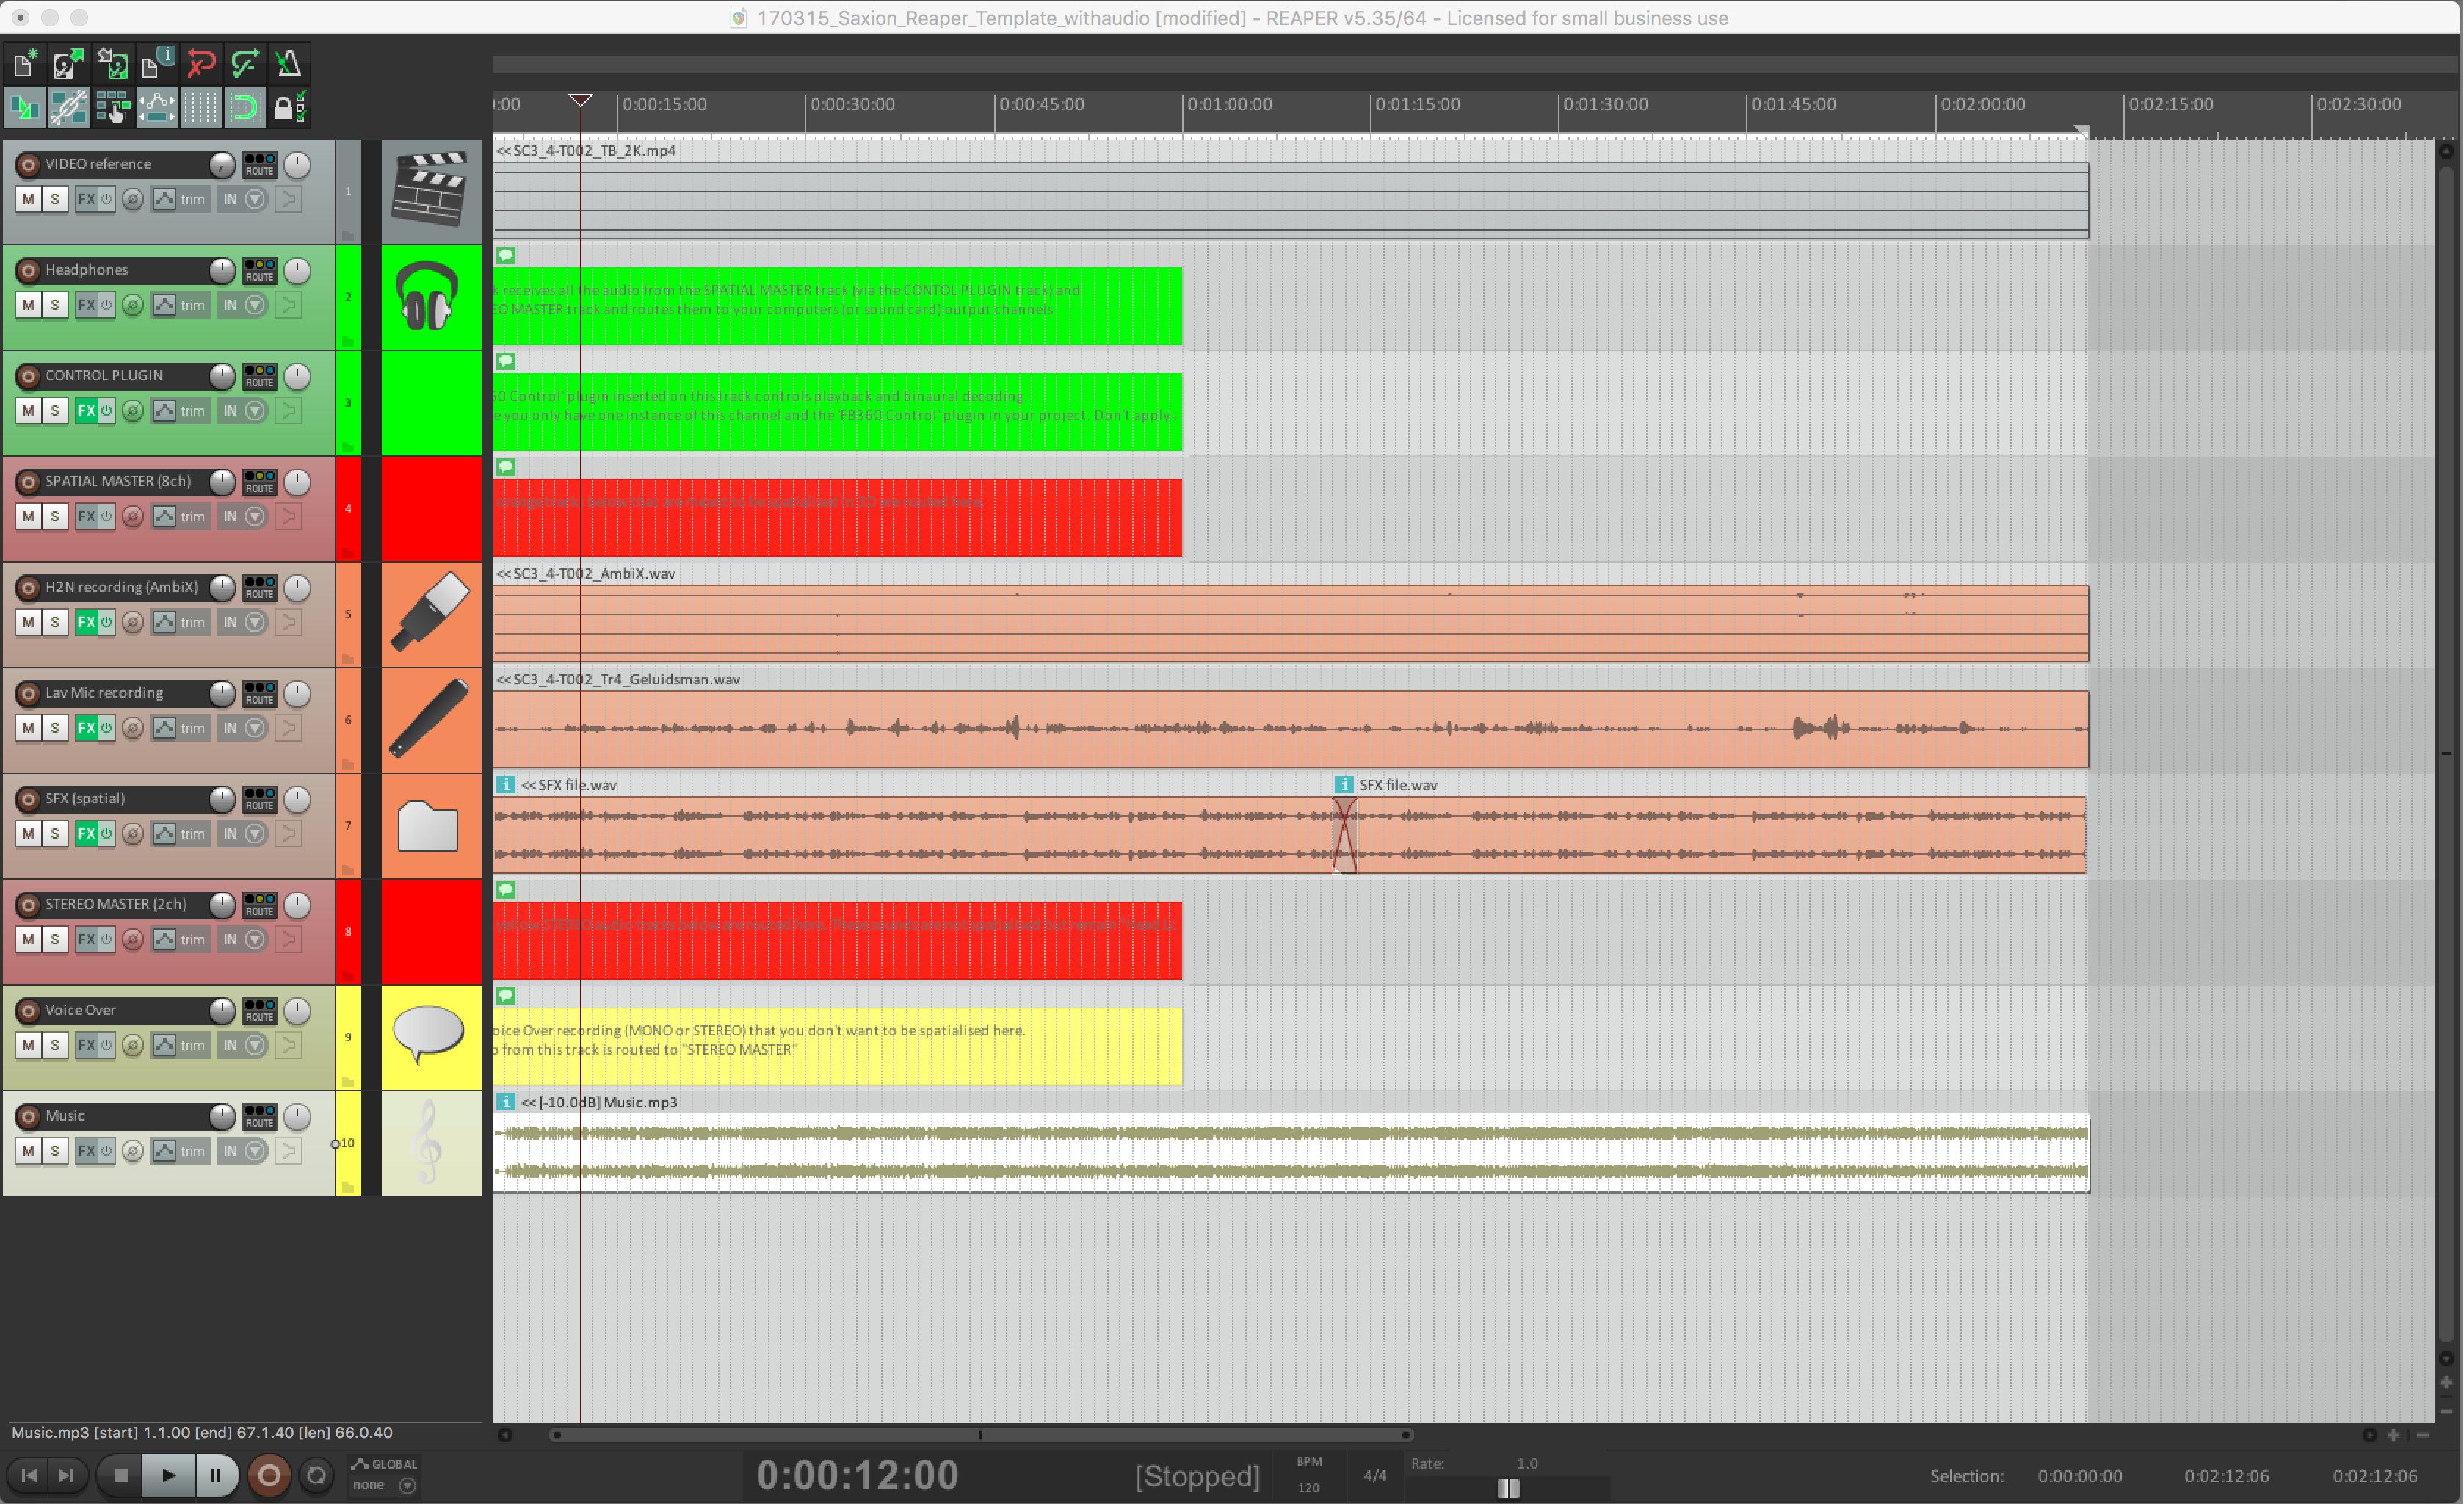
- Populate your mixing session with the recorded audio files: make sure to put the audio in the designated tracks
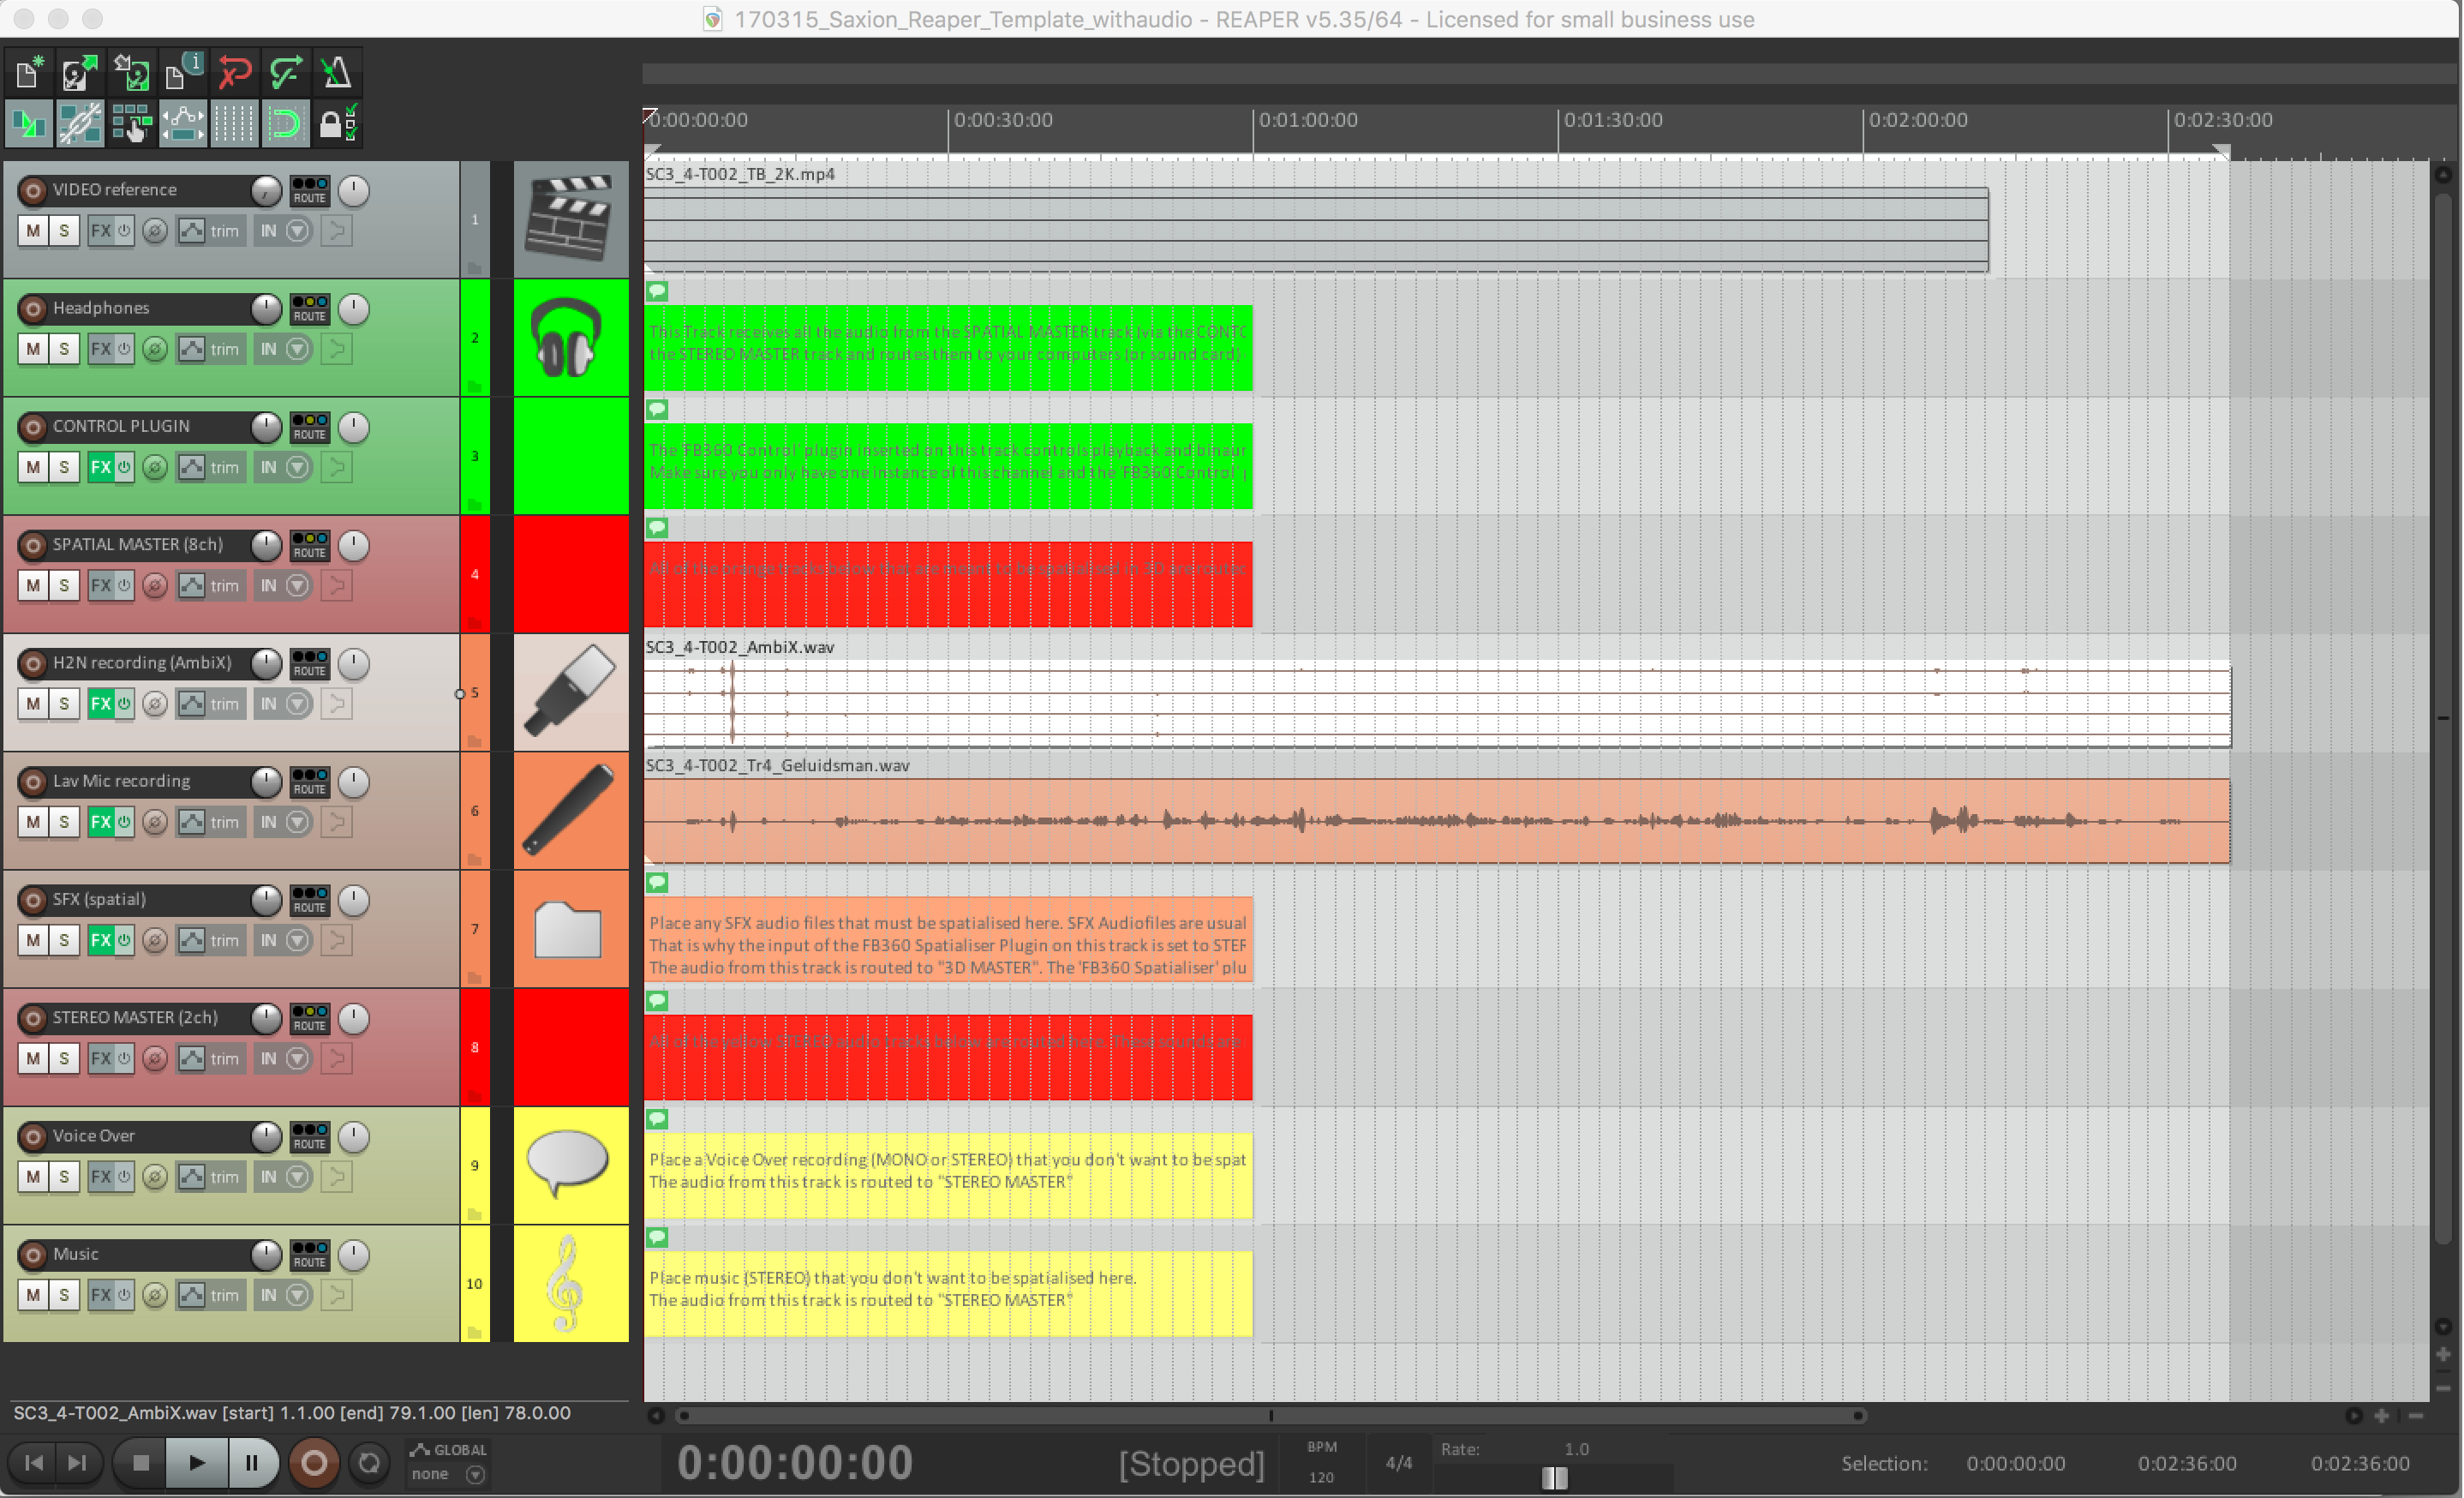
Reaper template with audio and reference video
- Align the recorded audio with the video
- Open the Audio 360 Spatialiser plugin on the H2N recording (AmbiX) track by clicking the green FX button on that track.
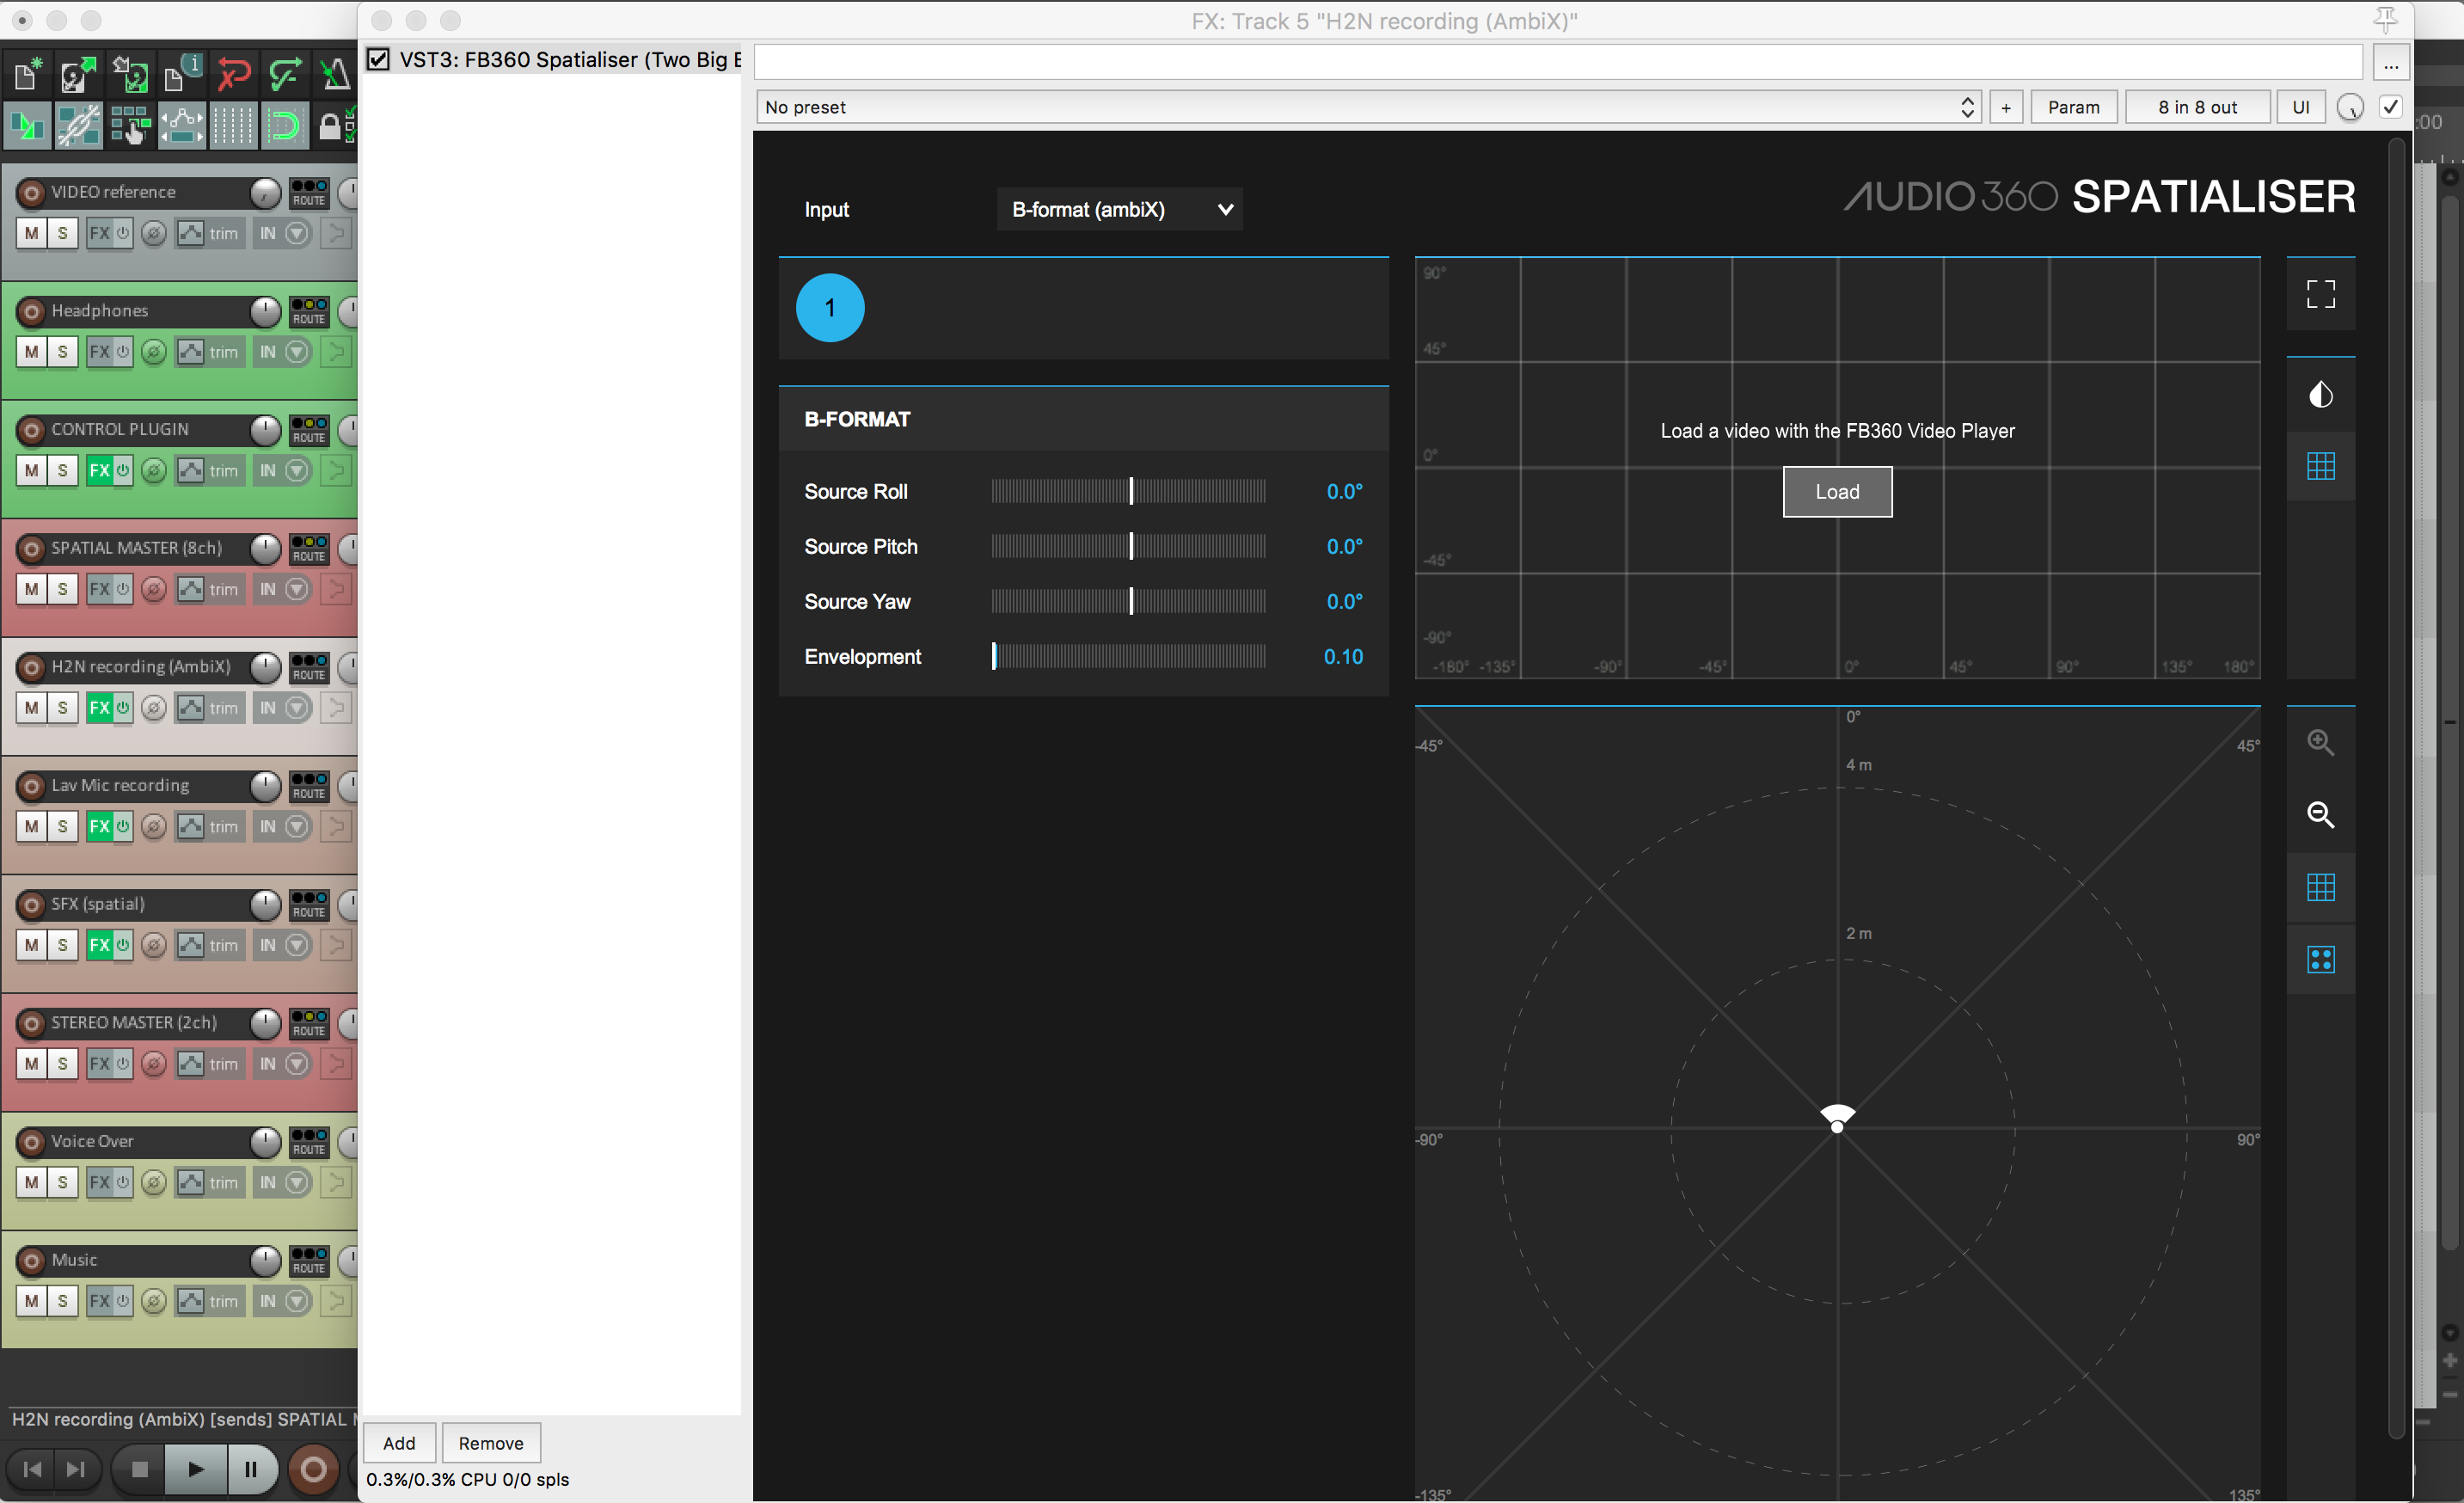
FB360 Spatialiser plugin on H2N track
- Load the 360 video in the Spatialiser plugin. Select the proper format for your video and select “desktop” as display mode. Click “Open”. This opens a separate 360 video window in which you can look around by dragging with your mouse. When you do this you will hear the spatial audio rotating with your ‘head’ movement. You need to keep this window open for the video to remain in the plugin. If you experience playback problems follow this guide for the best video formats
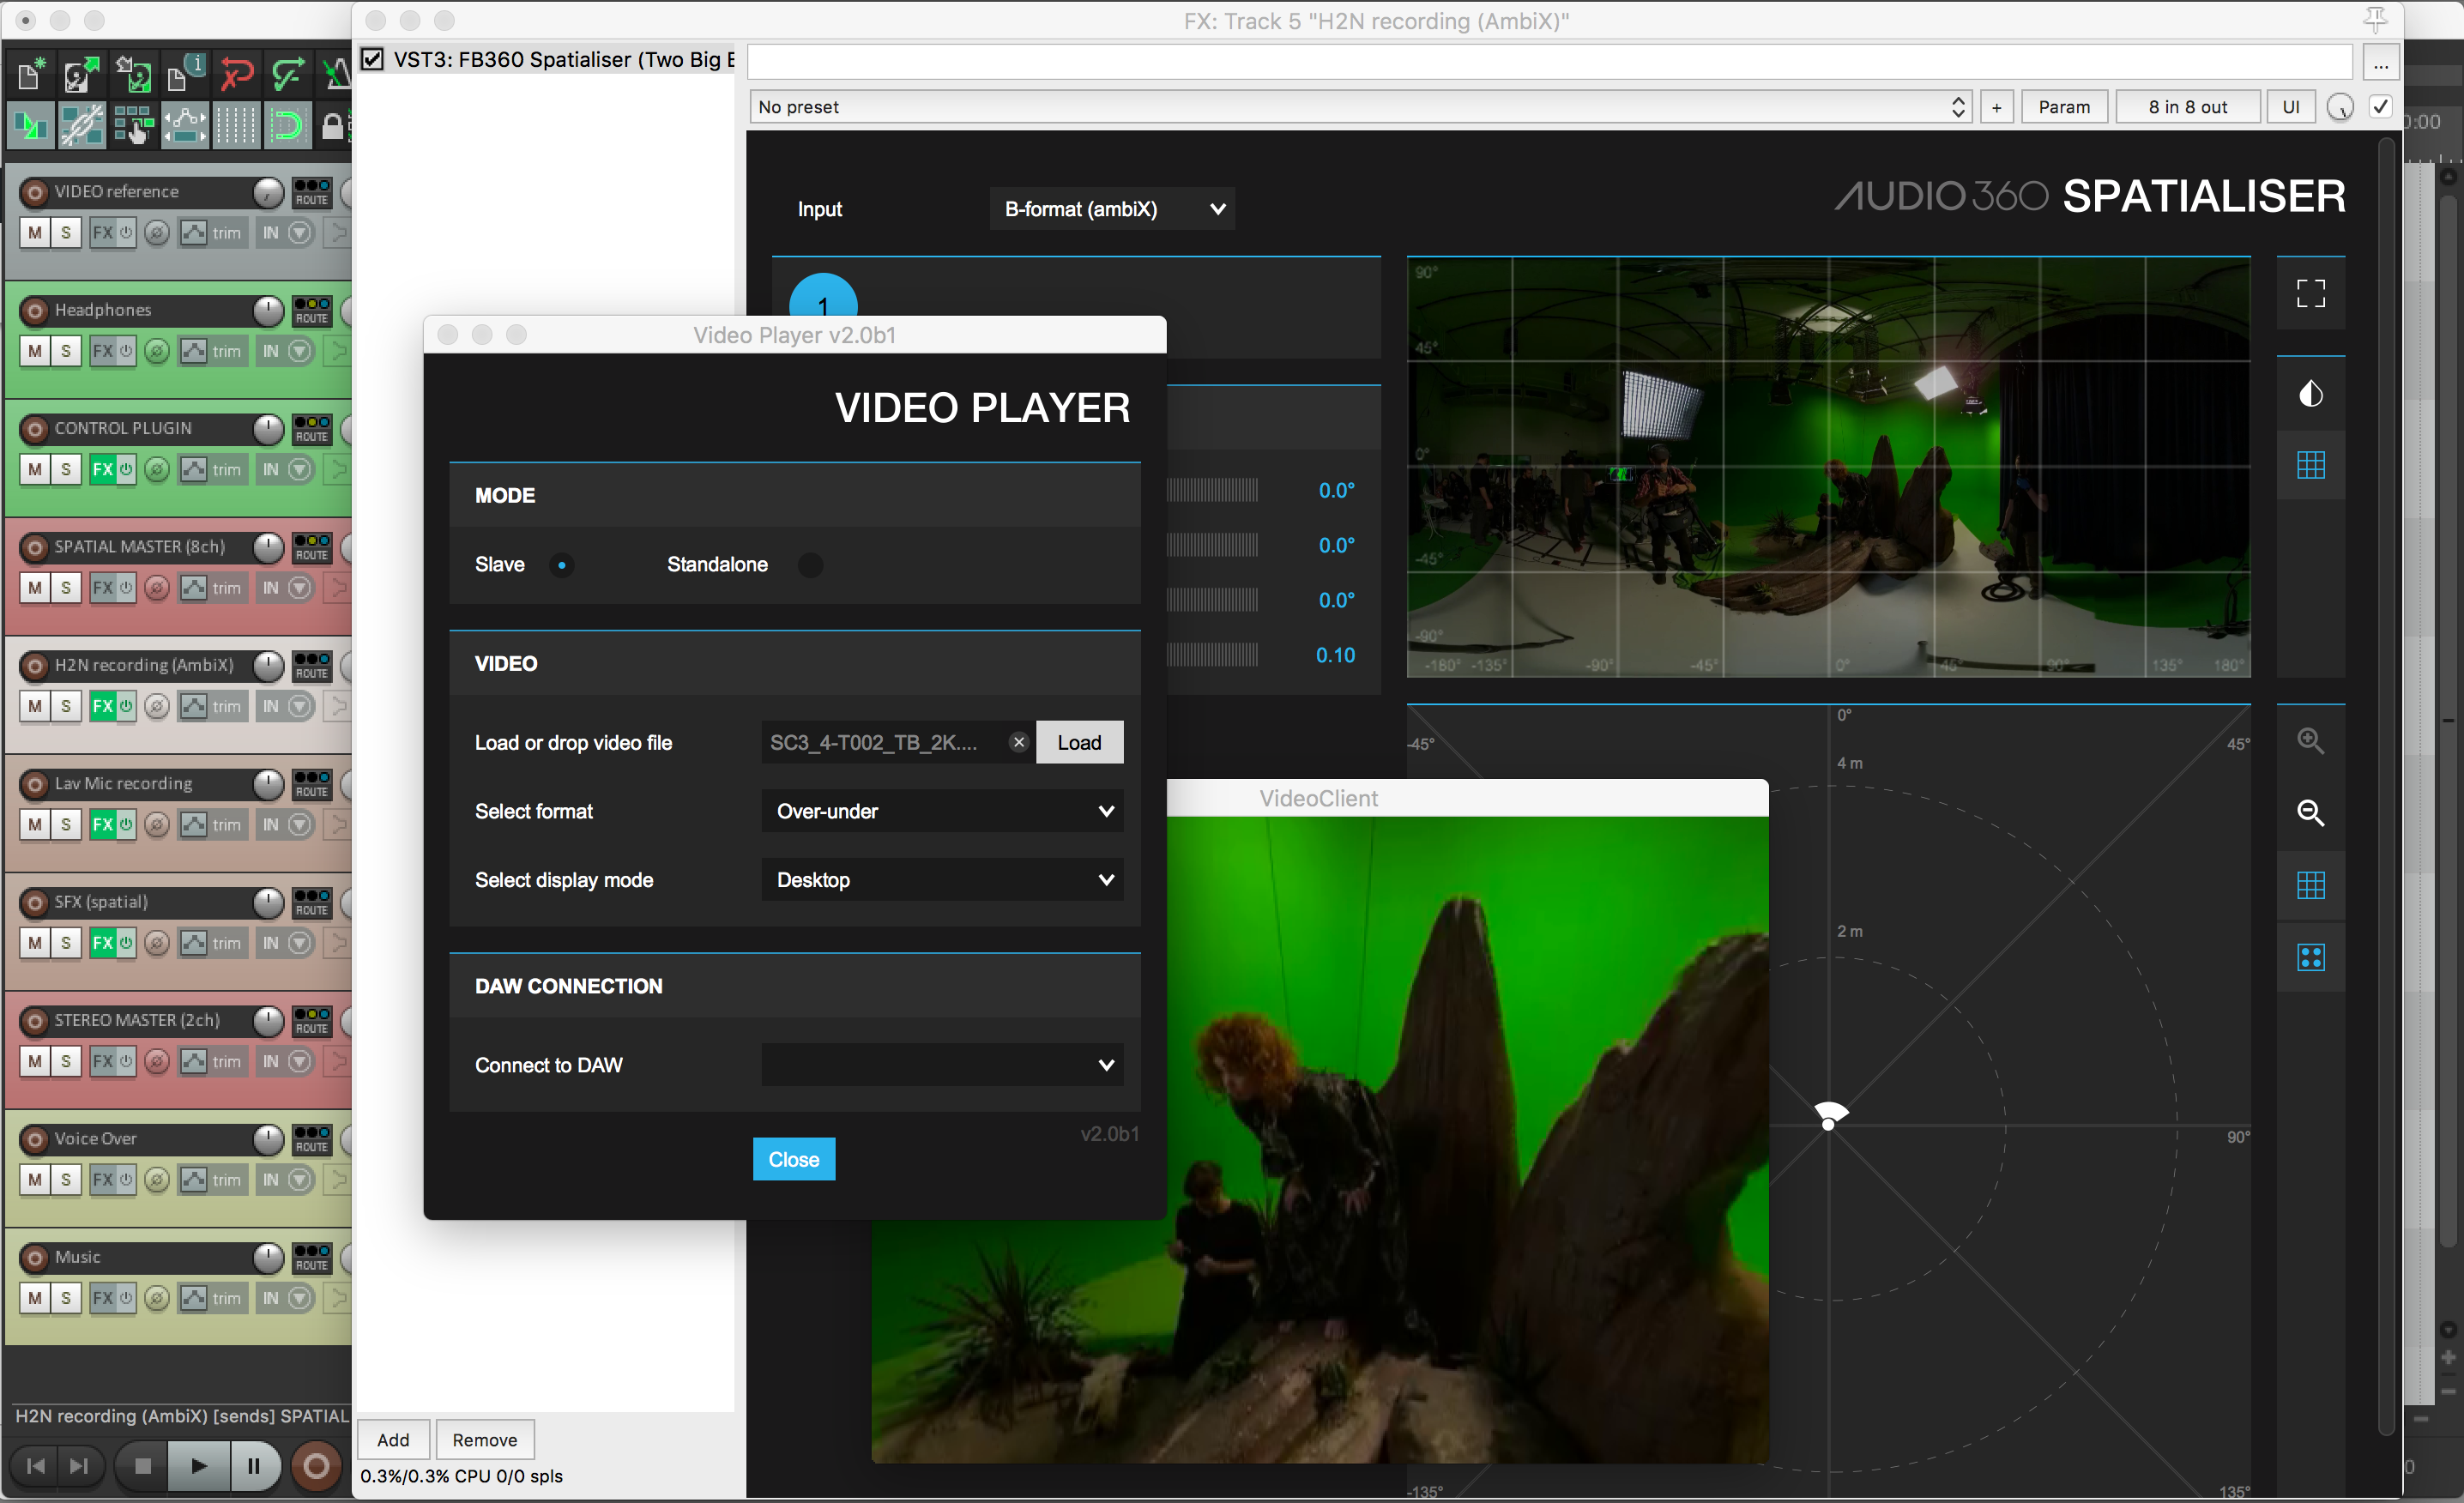
Loading a 360 video in the FB360 Spatialiser plugin
- In the FB360 Spatialiser plugin on the H2N recording (AmbiX) track the input is set to B-format (ambiX) because a recording made with the Zoom H2N (when set to spatial audiomode) is in ambiX format. This is already a 4 channel spatial audio format. The only controls visible in the FB360 Spatialiser are to rotate and tilt the sound field so that it matches your video. Use the Source Yaw control to rotate the sound field in the horizontal plane. If you made more recordings with the Zoom H2N and would like to add these to your projects as well you can duplicate the H2N recording (AmbiX) track as often as you’d like.
- If you recorded with lavalier or other (mono) microphones: make sure to spatialise these sounds according the the appropriate place in the video. To do this open the FB360 Spatialiser plugin on these tracks.
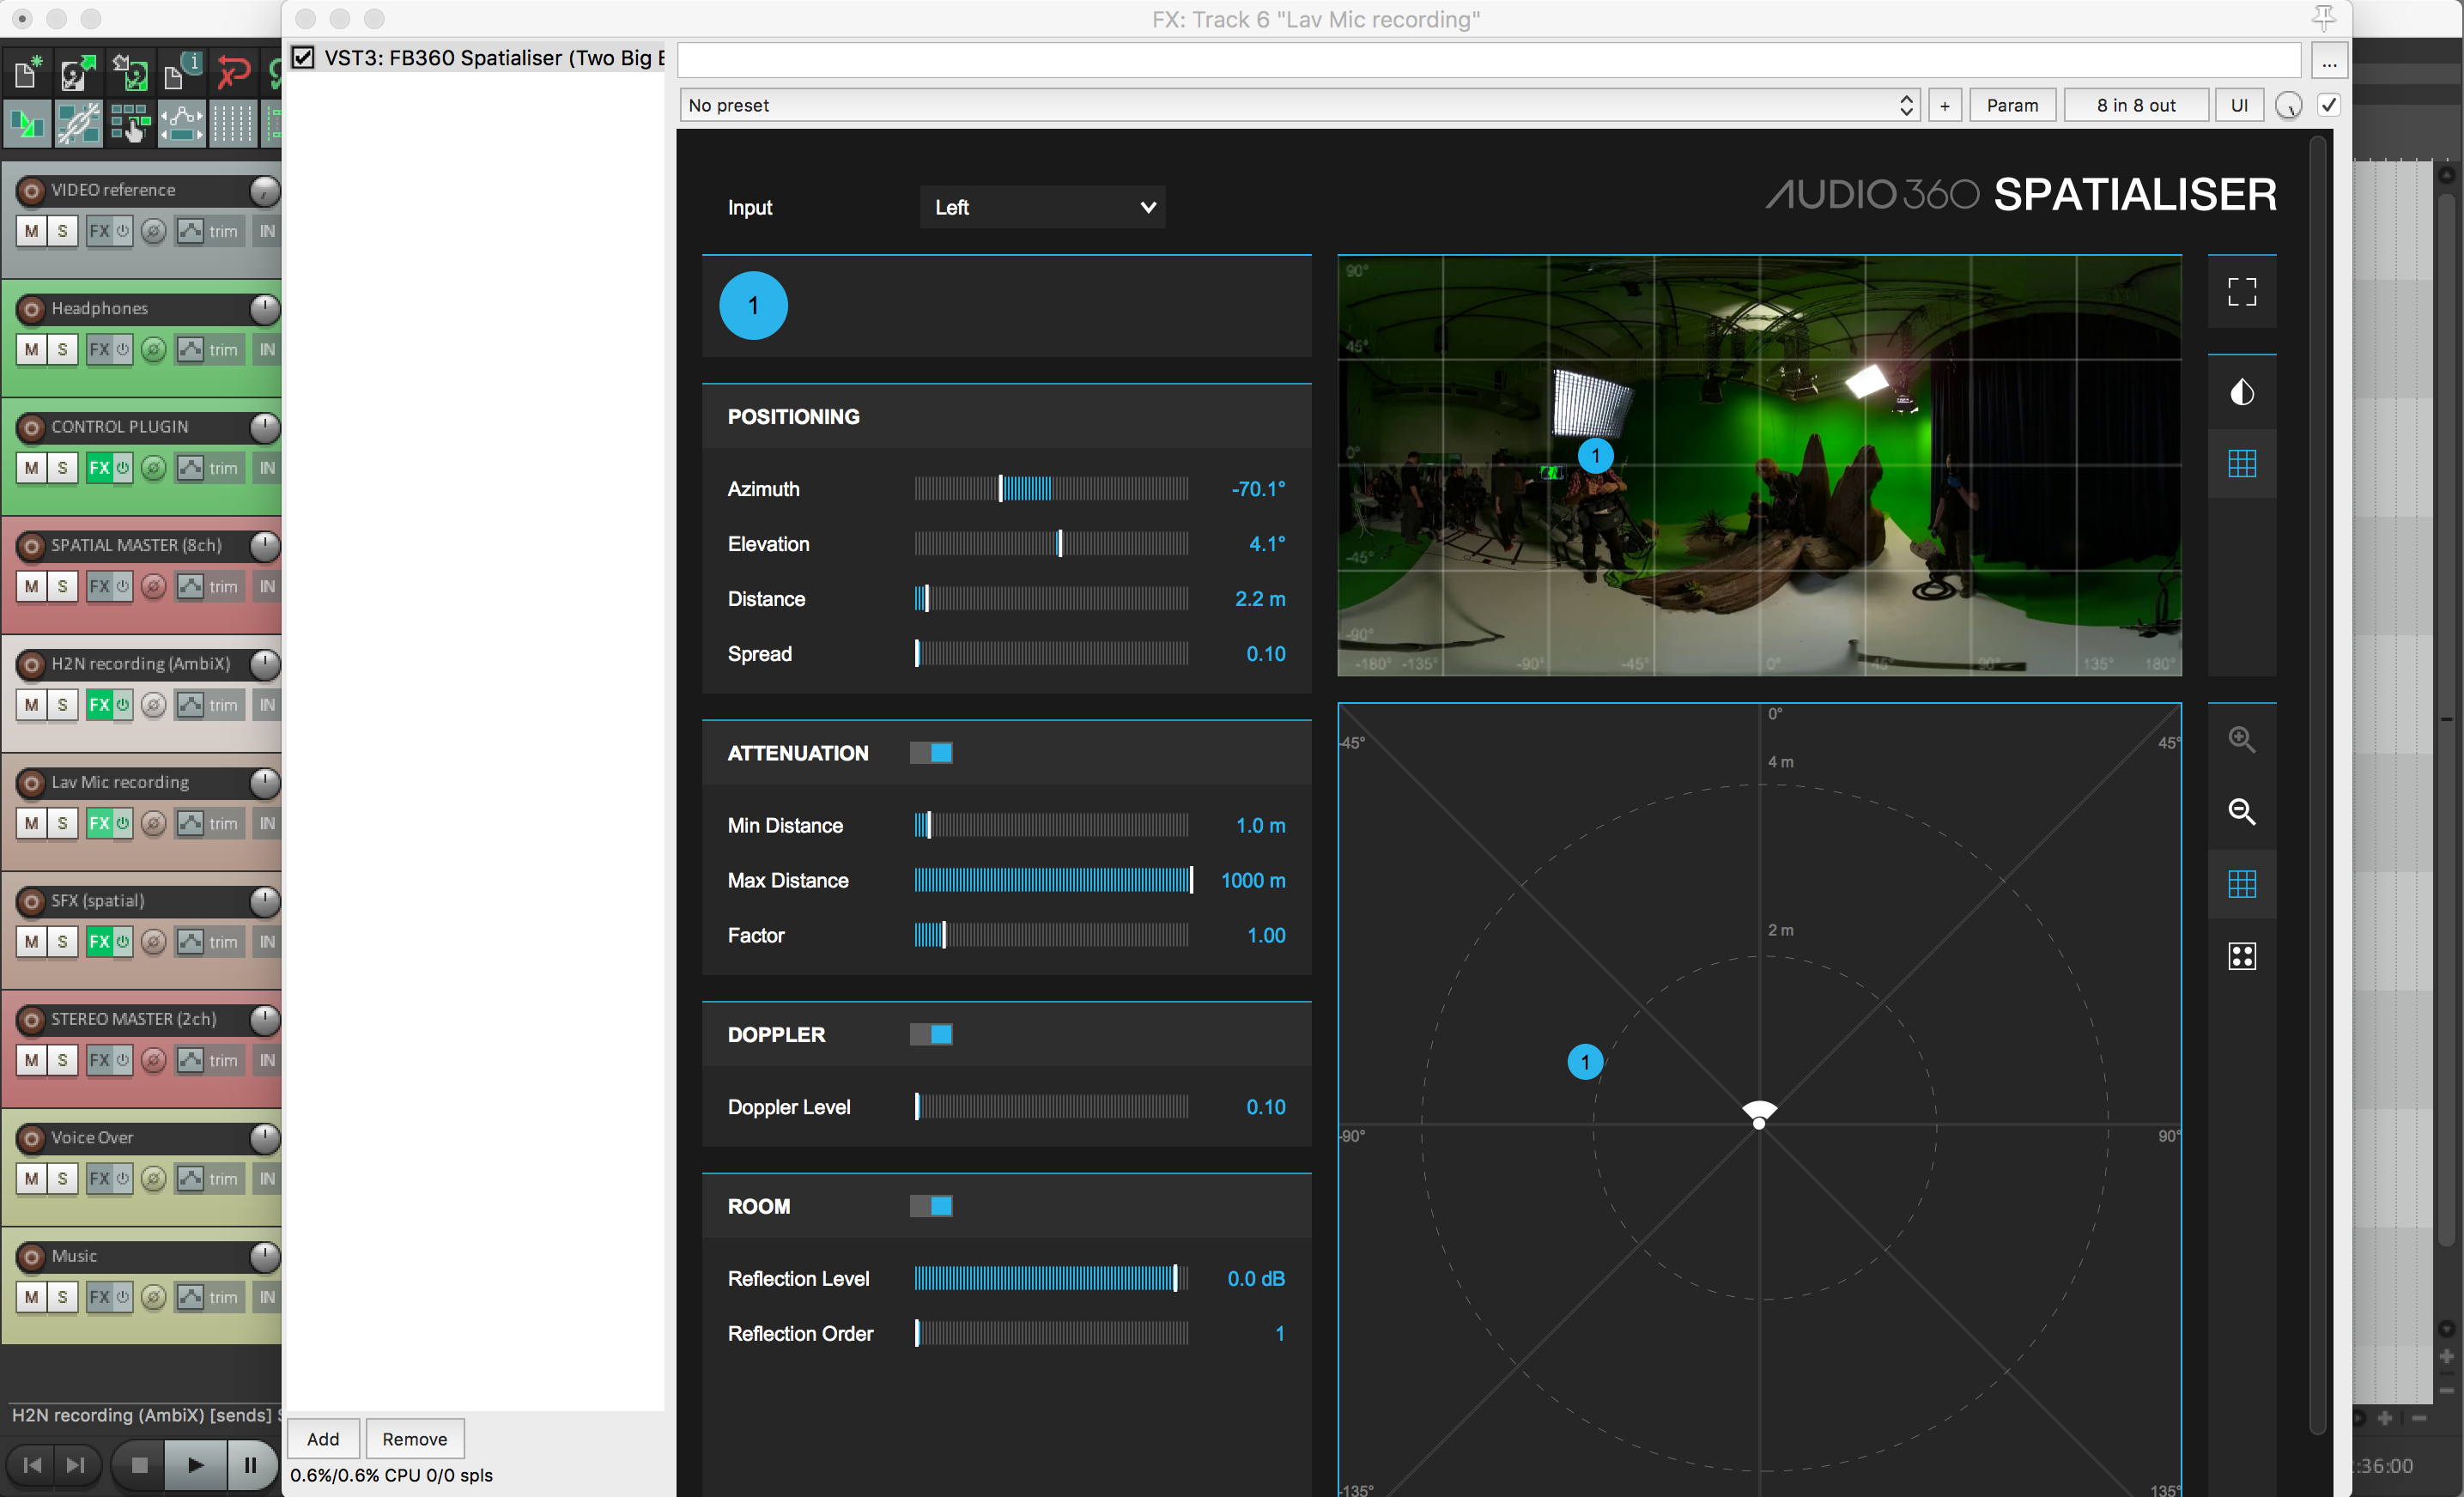
FB360 Spatialiser Plugin on a mono source track
- In the FB360 Spatialiser plugin on the Lav Mic recording track the input is set to Left because we use a mono source as input (typically the left channel of a stereo track). You can spatialise the sound of this recording by moving the blue dot over the video window so that it matches the intended source in the video.
- The Lav Mic recording track can be duplicated as many times as you like to add more audio sources from lavalier recordings to your project. If you have recorded more actors you can name the tracks accordingly.
- Underneath the Lav Mic recording track is a track called SFX (spatial). This track is set up in a similar way as the Lav Mic recording track. You can use this track to add sounds from file that you would like to add to your project and spatialise. Because sounds from file are typically stereo files, the input of the 360 Spatialiser plugin in this track is set to stereo. Now you have two sources in the plugin that you can spatialise: one for the left channel and one for the right channel.
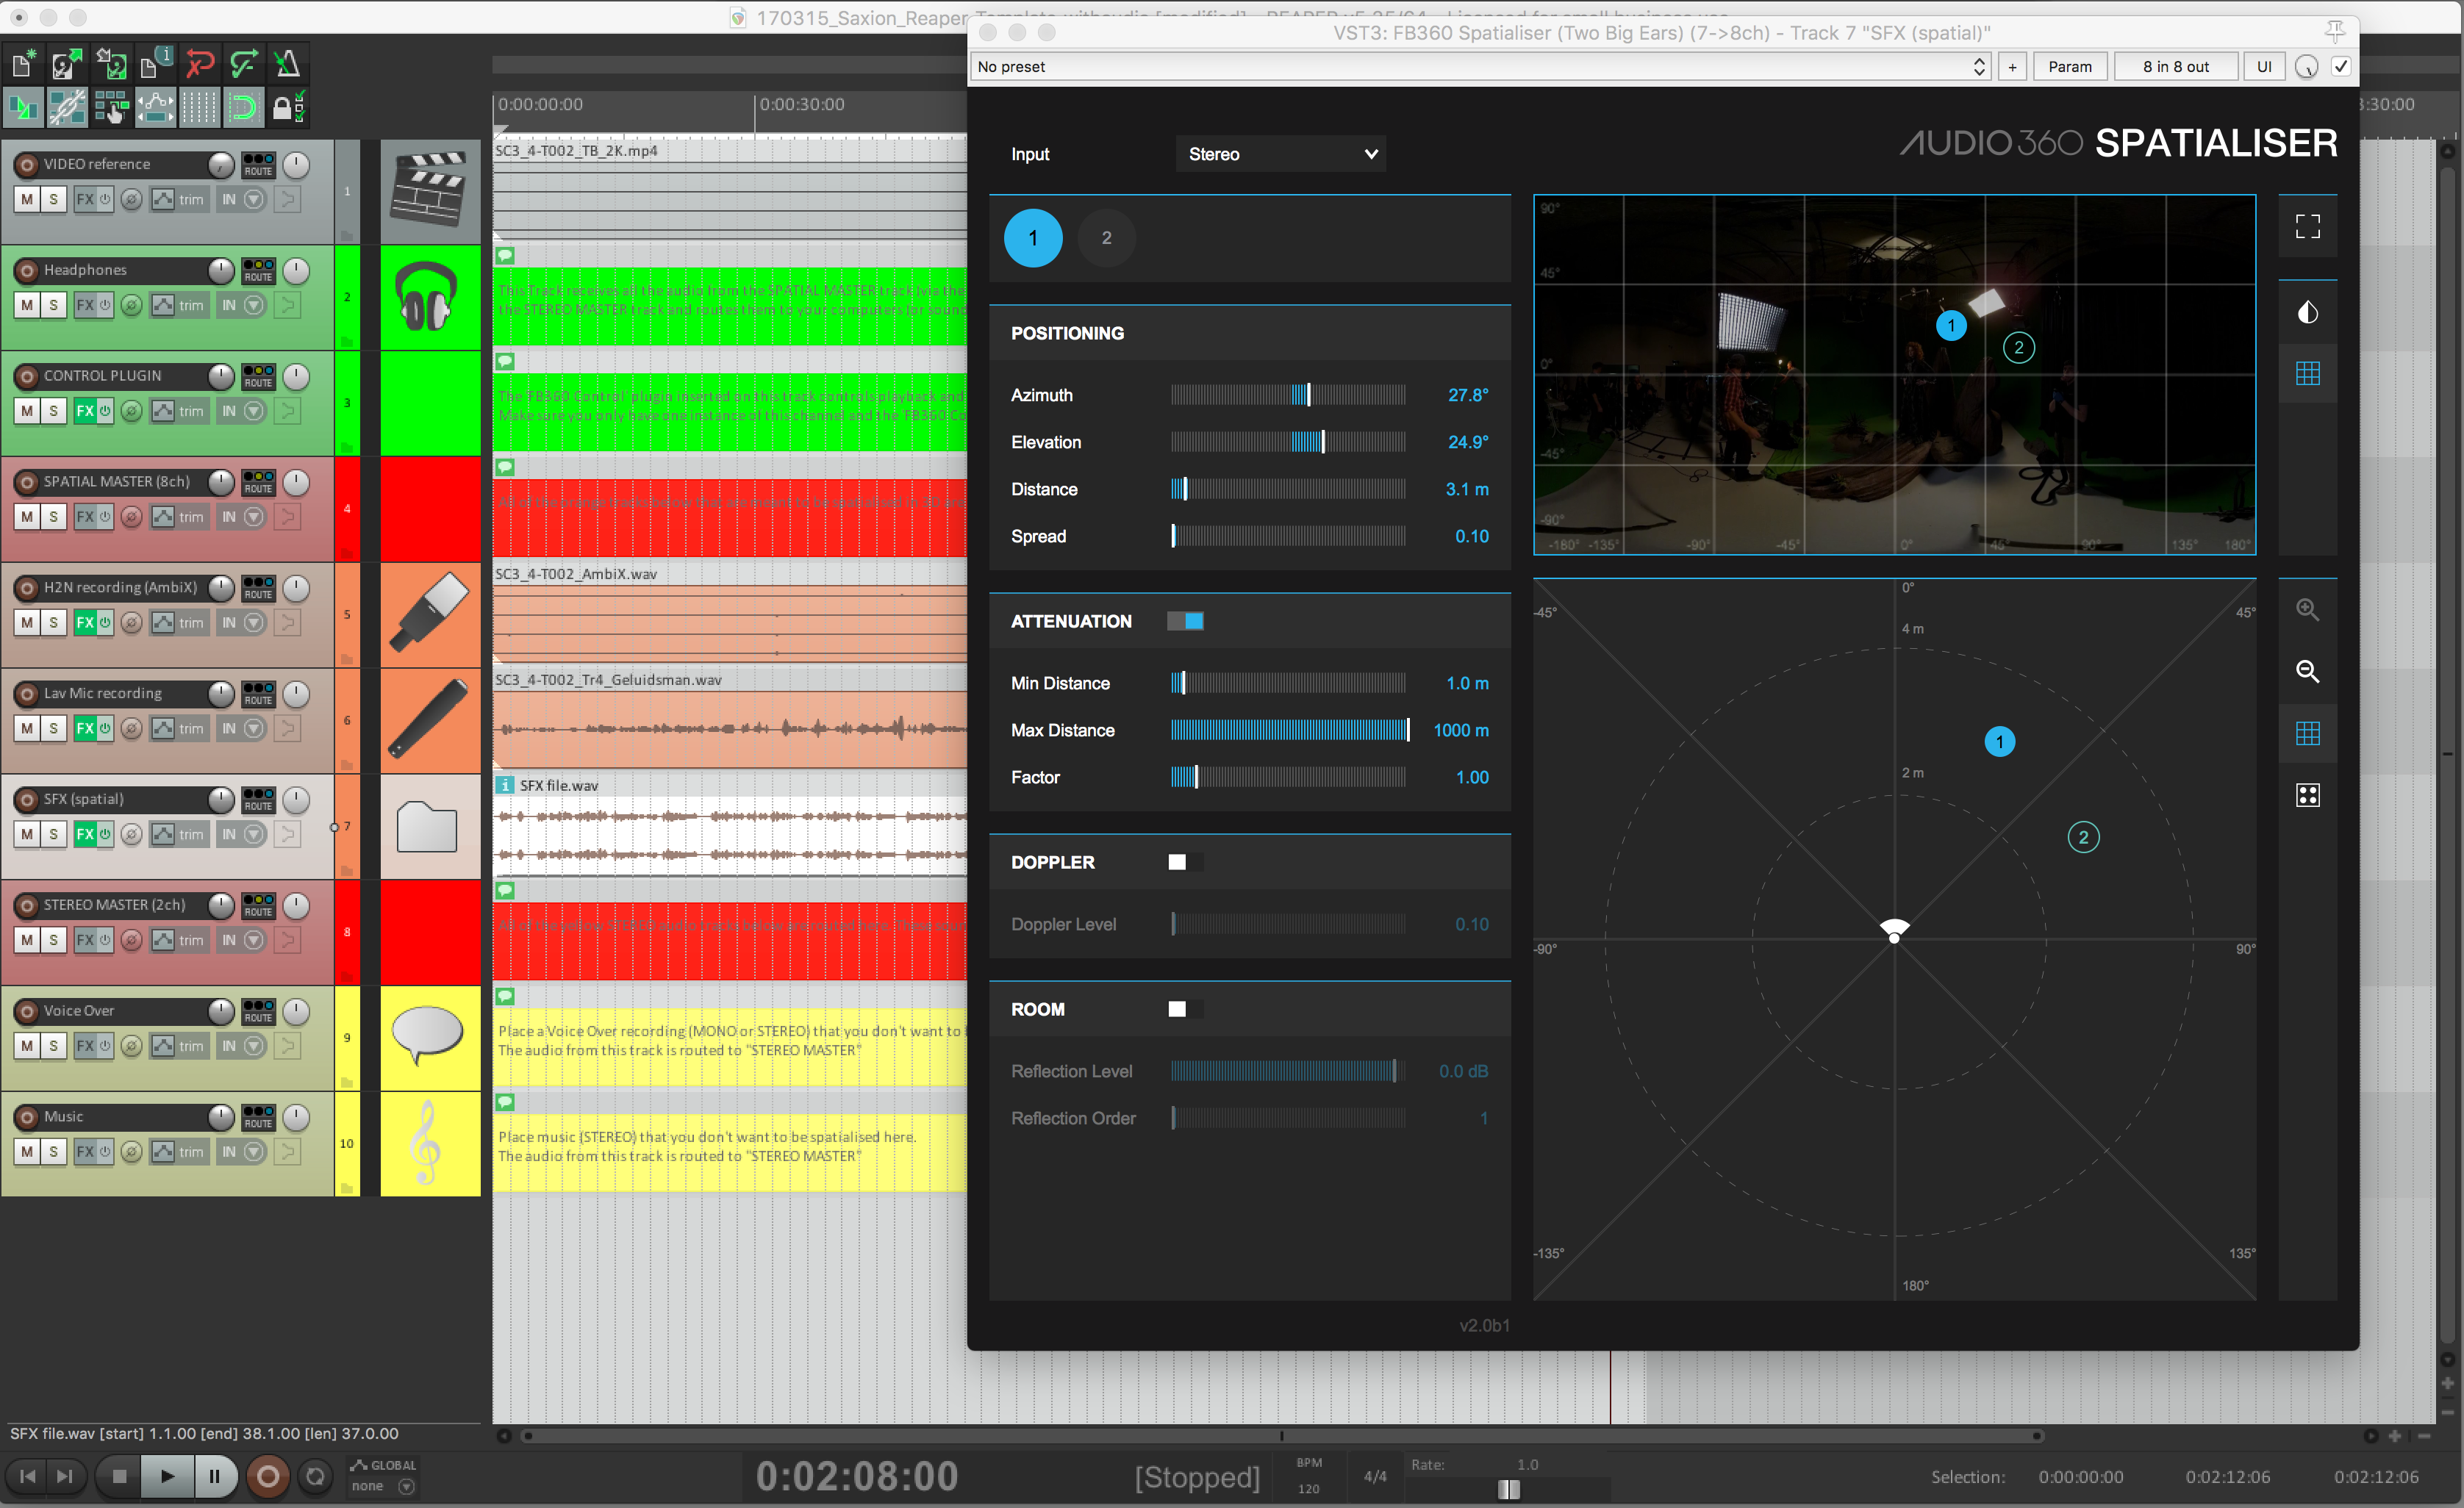
FB360 Spatialiser Plugin on a stereo source track
- Additionally you can add music, voice over or other stereo files to your project that you would not like to spatialise. Add these audio files to the yellow tracks at the bottom of the template project. Audio placed in these tracks will remain “head locked” in your final video. Typical uses would be for voice over or score music.
A music track added to the project
- Now that the project is populated with all the audio you can start setting the balance (volume) of the tracks: this is by far the most important part of mixing.
- If you would like to add other effects (plugins) to the orange spatial audio tracks make sure to add them BEFORE the FB360 spatialiser plugins.
- for more in depth information about the FB360 Spatial Workstation check the manual that comes installed with the software on your system.
3) EXPORT, ENCODE & PUBLISH
EXPORTING
- Set the time selection markers to the length of the reference video. The markers mark the start and end of the audio we are going to export.
- Select ONLY the two tracks that we are going to export: “SPATIAL MASTER (8ch)” and “STEREO MASTER (2ch)”
- Go to [File / Render]
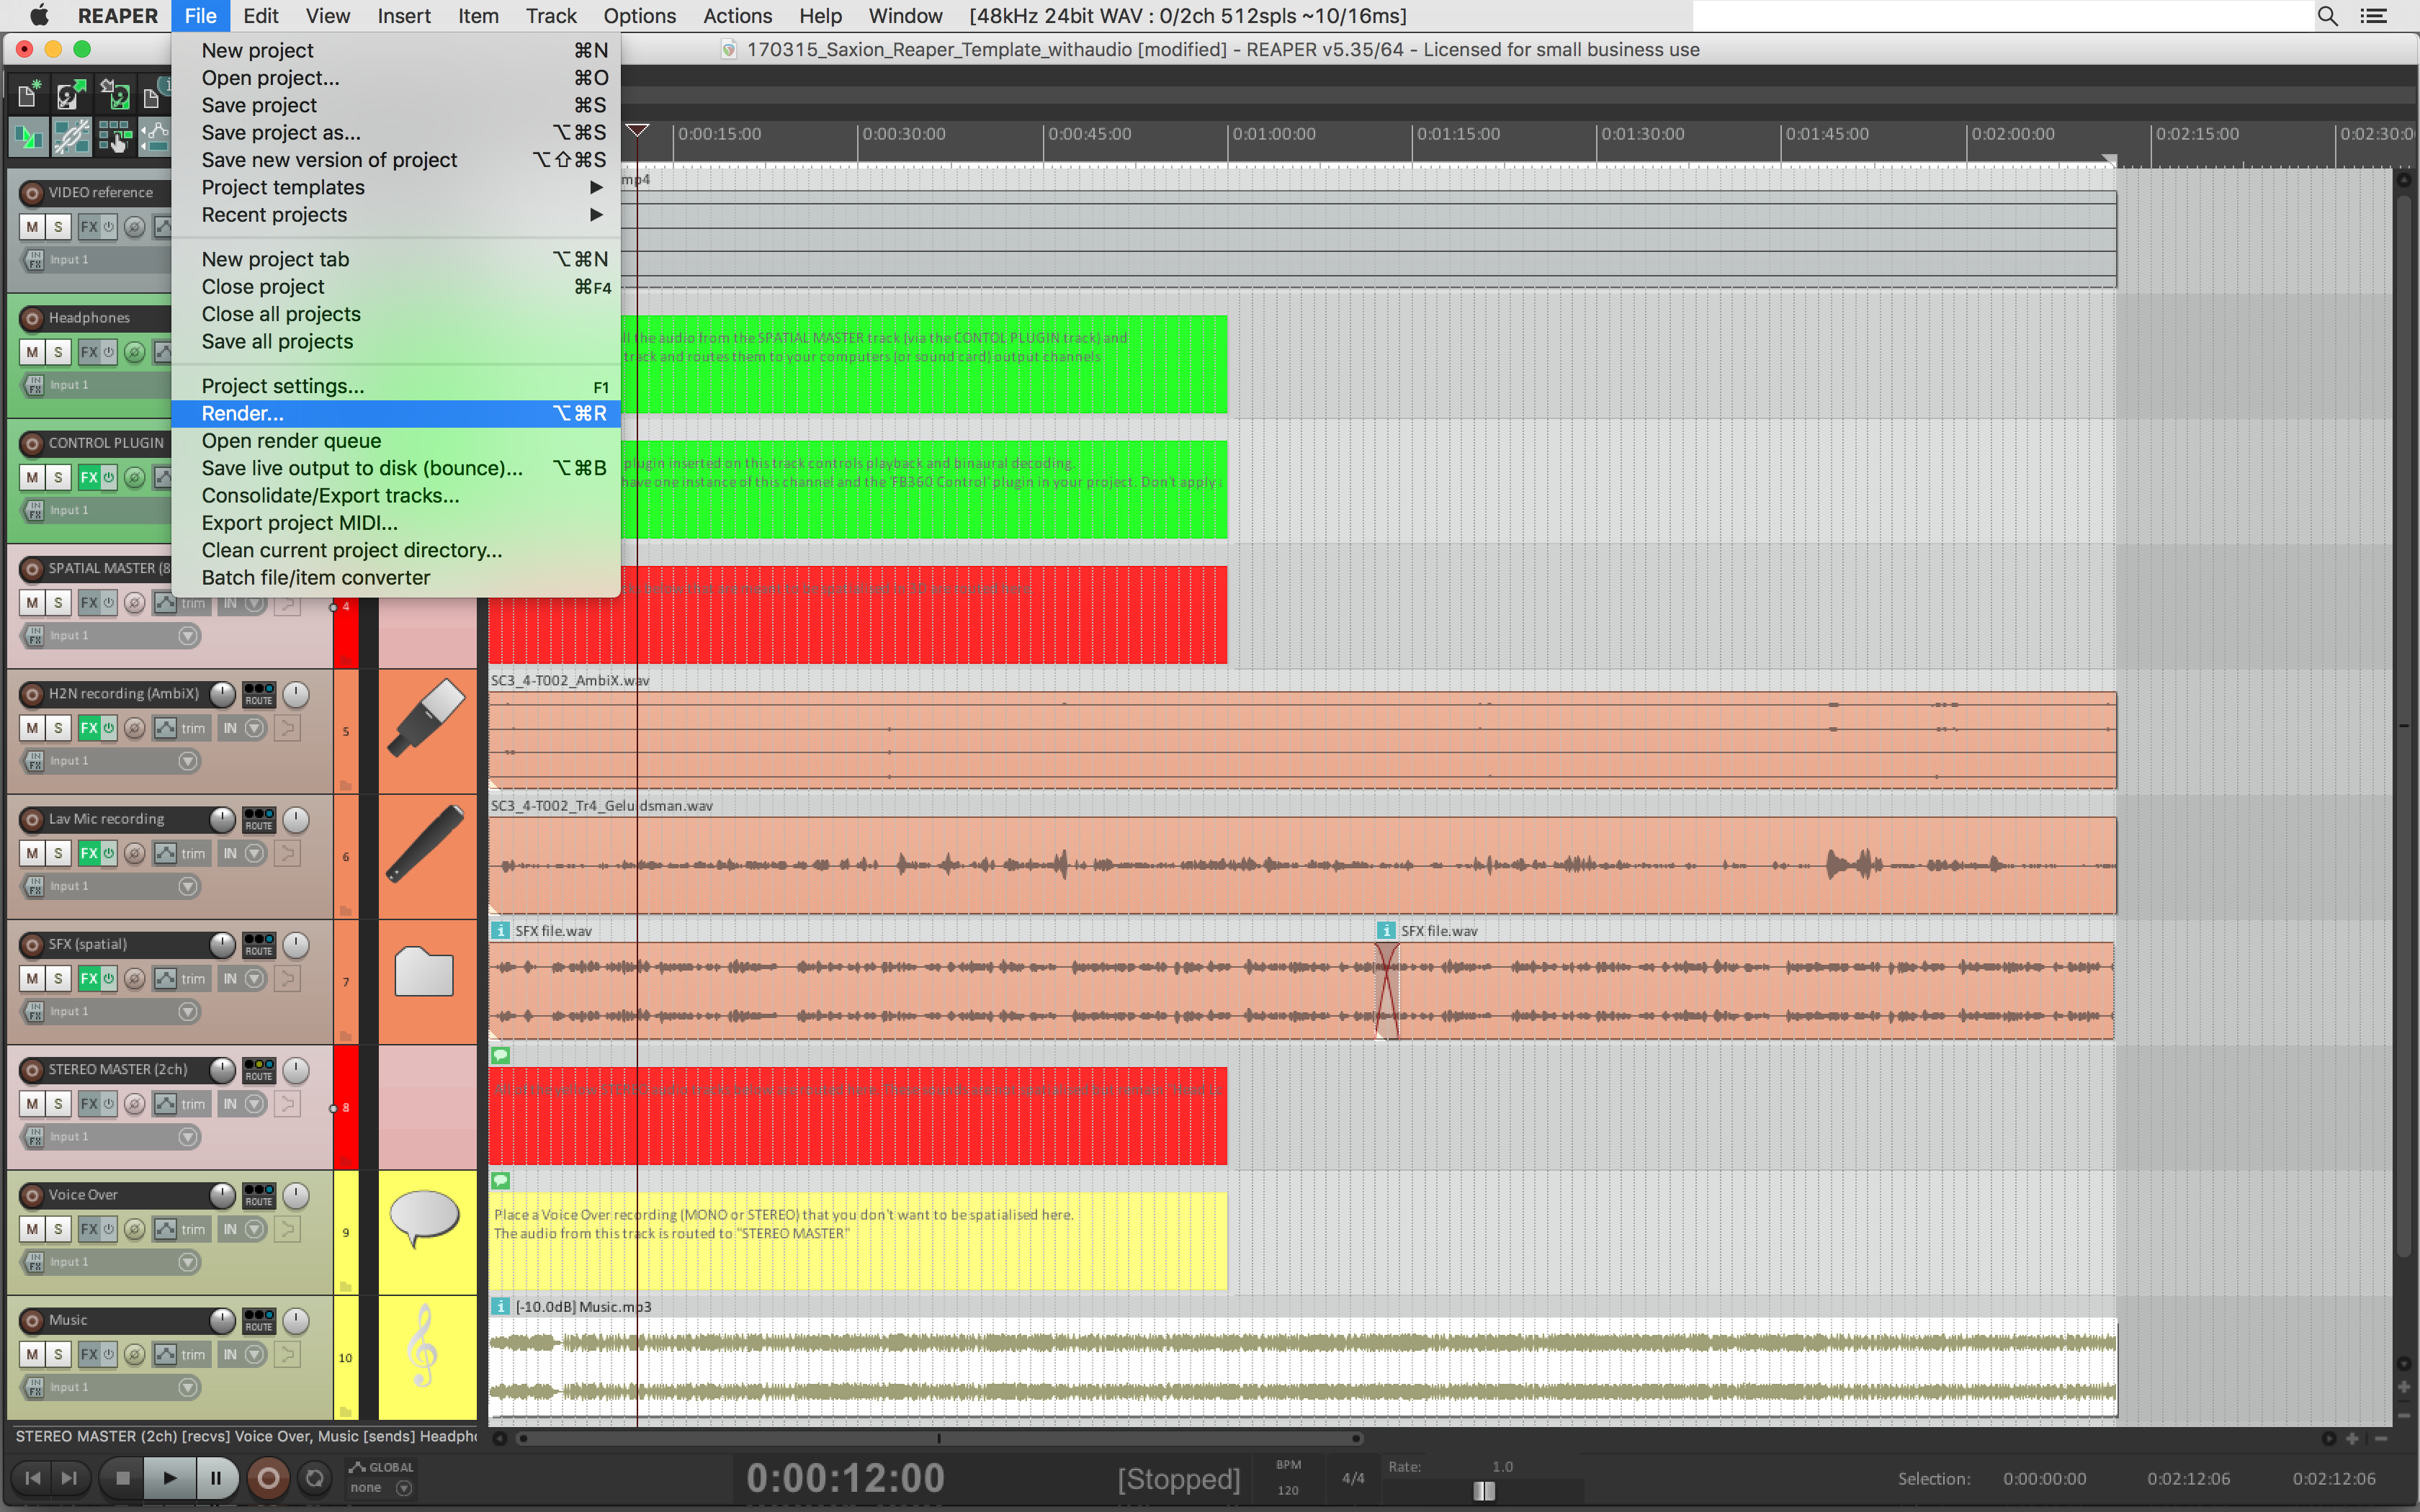
Set the time selection and select the two master tracks
- In the “Render to File” menu set as the Source “Stems (Selected Tracks)” and as Bounds: “Time Selection”
- Under “Output” select the place where you would like to render your file
- Under “File name” select Wildcard $track: this will name the 2 audio files with the tracknames from your project
- Under Options set: 48000Hz Sample Rate, Channels: 8
- Check the box “mulitchannel tracks to multichannel files”
- Output format: WAV, WAV bit depth 16 bit PCM
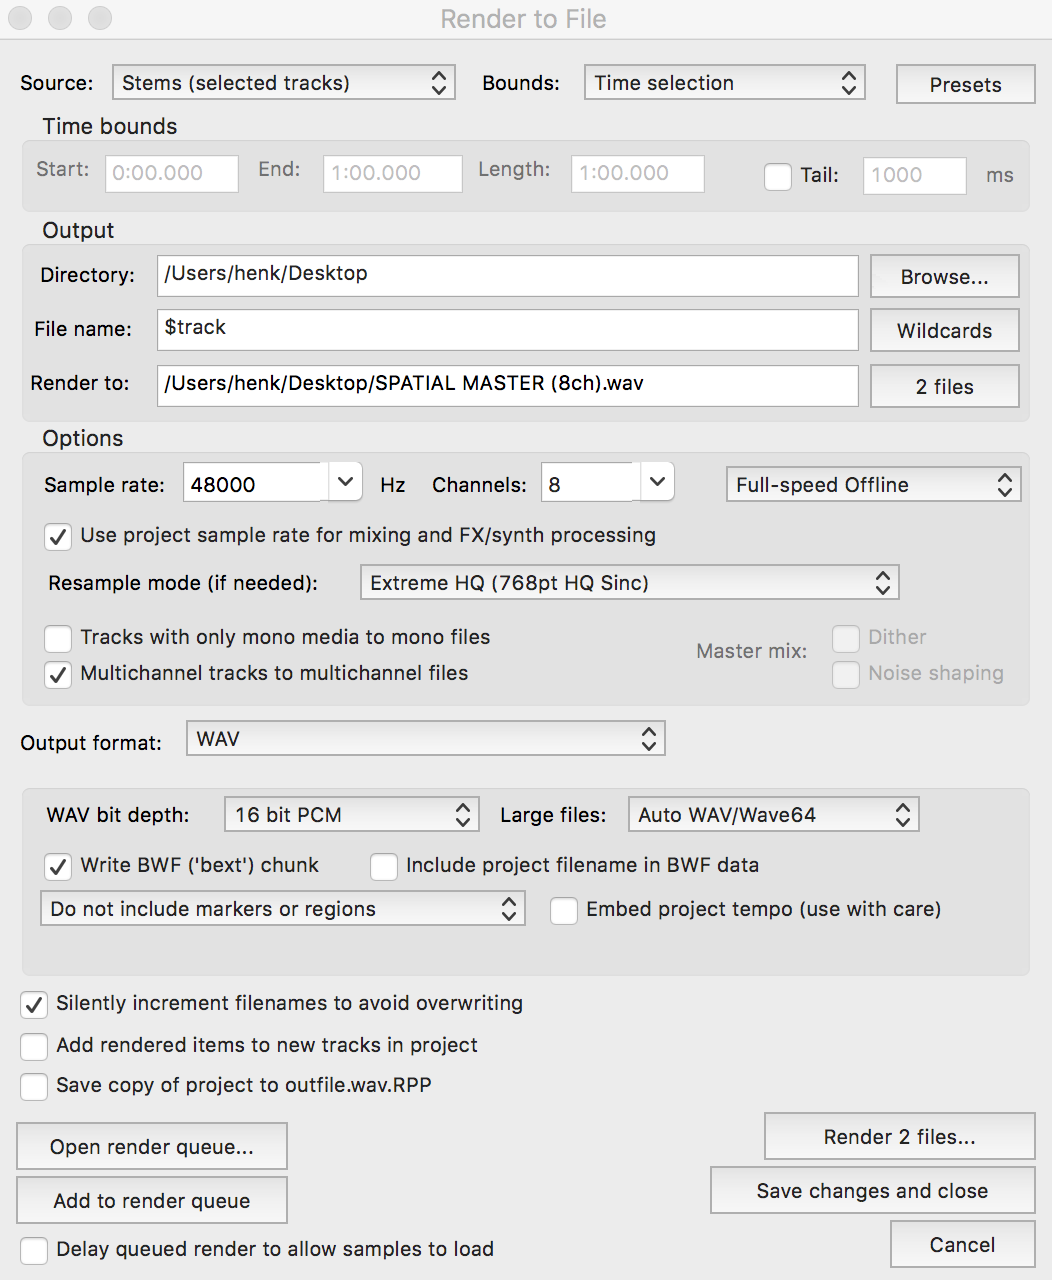
Reaper’s “Render to File” window
- Click “Render 2 files…”
ENCODING
The Encoder application is installed in Mac HD/Applications/FB360 Spatial Workstation/Encoder on macOS and C:\Program Files\FB360 Spatial Workstation\Encoder on Windows. It can be used to convert your mix to a variety of formats or create a file that can be uploaded to Facebook 360.
Additional Requirements (Windows Only)
The Encoder requires Mp4Box and Python 2.7 installed on your Windows computer.
- The Python 2.7 installer can be downloaded from here. Follow the instructions with the installer.
- Mp4Box can be installed using the GPAC installer from here. The GPAC installer includes Mp4Box and other components. Installing the additional components is optional
Encoding For Facebook 360
- Open FB360 Encoder
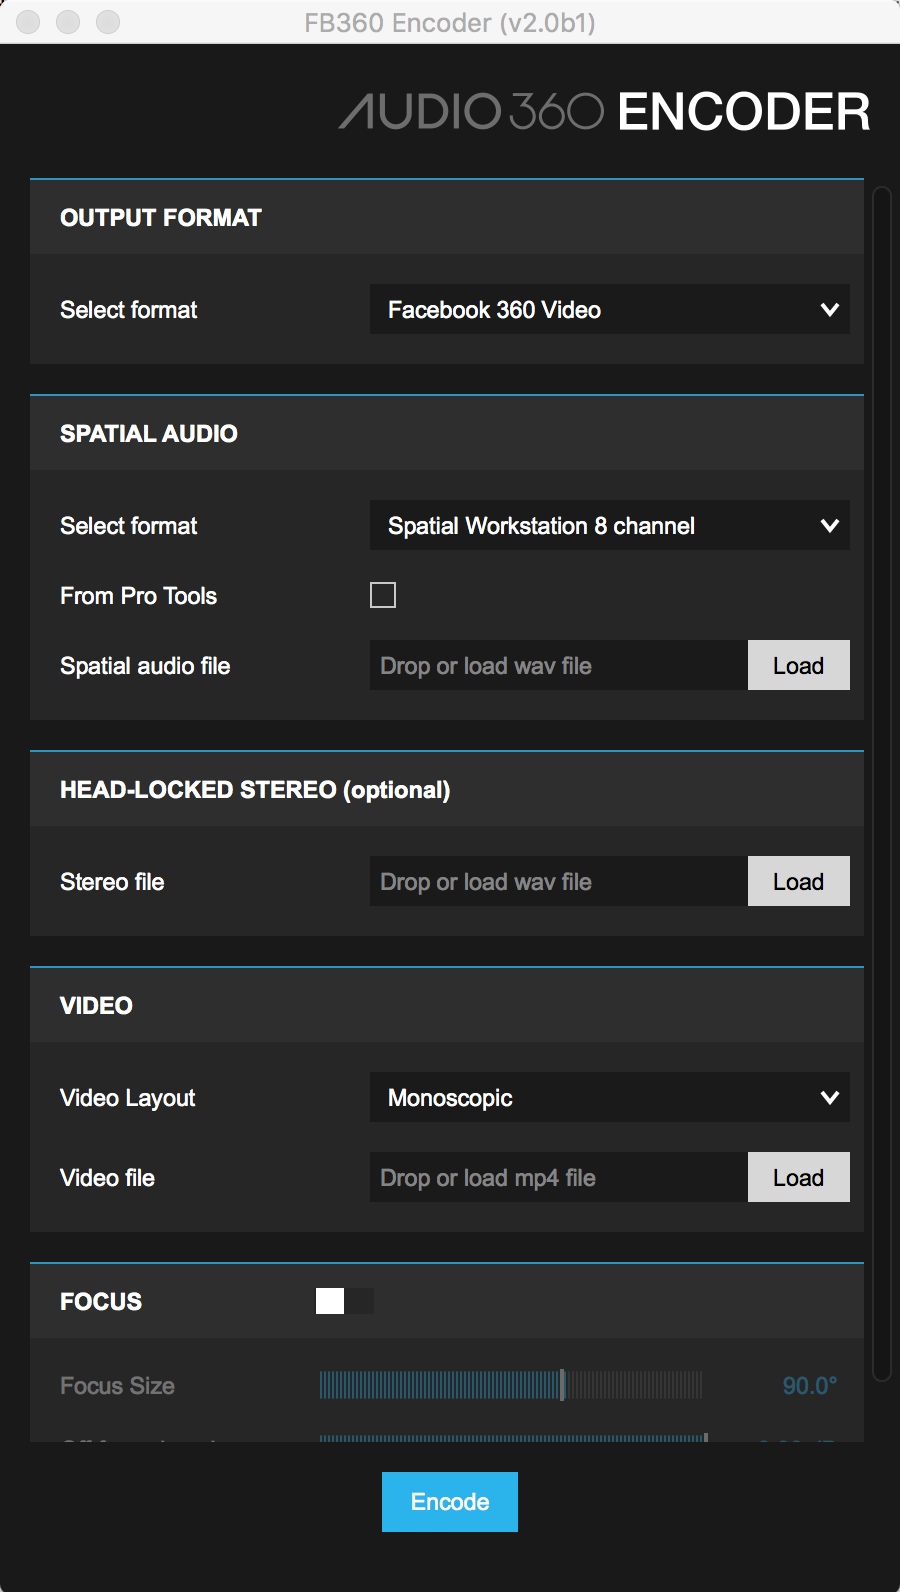
The FB360 encoder
- For uploads to Facebook, ensure that OUTPUT FORMAT is set to Facebook 360 Video
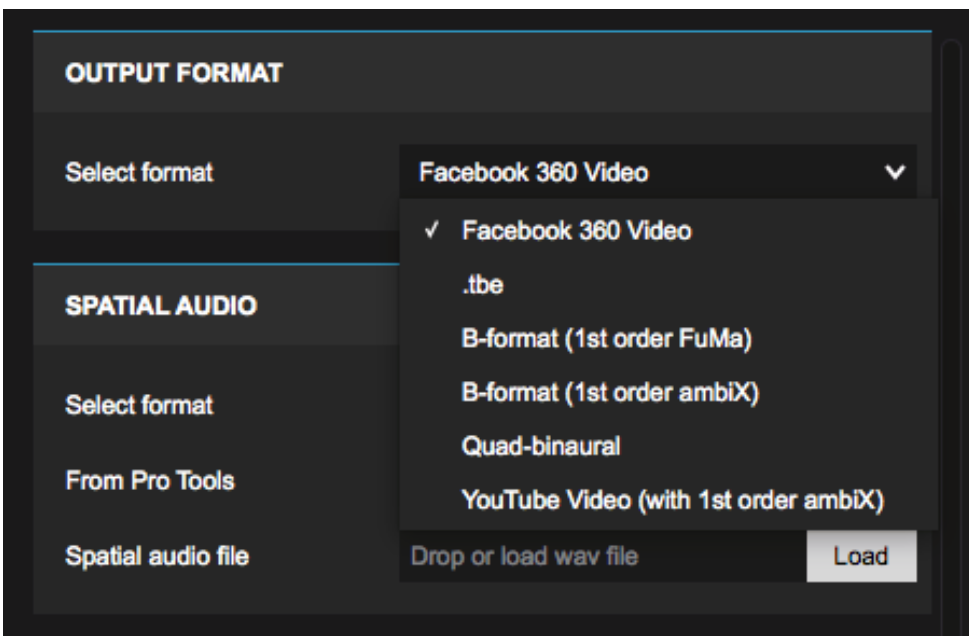
Select the output format
- Drop or load the multichannel spatial audio wav file. This is the audio that will rotate and respond when looking around a 360 video. The wav file can be of any sample rate, but is ultimately converted to 48000Hz samples per second
- Ensure you specify the spatial audio format: “Spatial Workstation 8 Channel”
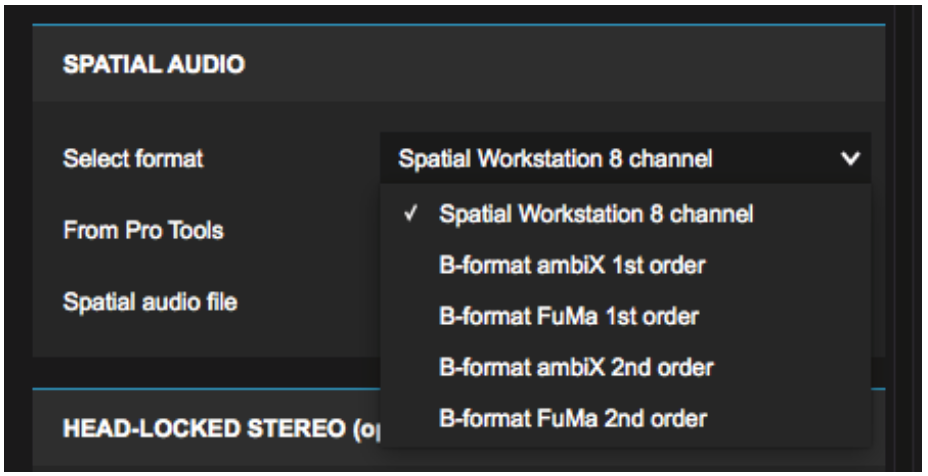
Add the 8 channel spatial audio track
- Optionally, you can also drop or load a stereo file for head-locked audio. This is audio that will not rotate when looking around a 360 video
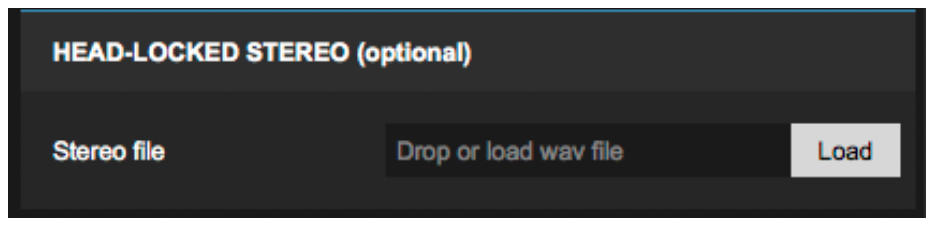
Optionally: add a head-locked stereo track
- Drop or load the video file. Ensure that the video is encoded as H.264 within an mp4 container
- Set the layout for the video file: Monoscopic: A video recorded with the Samsung Gear 360 will be monoscopic

Select the video layout of your 360 video
- For videos encoded in Facebook 360 format, you can optionally enable Focus for the video which will give more prominence to the audio objects in the viewer’s field of view and will attenuate objects outside of it:
- Focus: Enables the focus feature
- Focus Size: The size of the angle of the focus cone in degrees (ranged from 40 to 120)
- Off-focus Level: The attenuation of objects outside of the focus area in decibels (ranged -24.0 to 0.0)
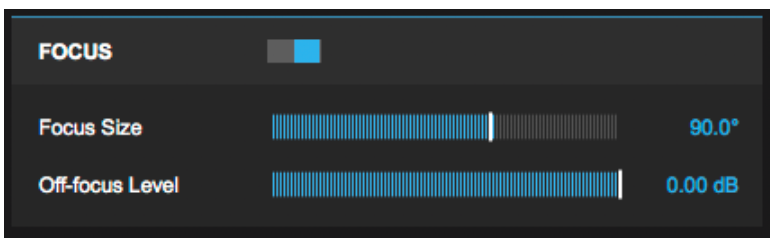
Optionally: add focus
- Click the Encode button and save your file
PUBLISHING
- Upload the video on Facebook
- For sideloading on an Android phone with Oculus Video check here
